
Part 2 - From Reverse Engineering to Cheat Development: Internal Game Hacks with AssaultCube
Introduction
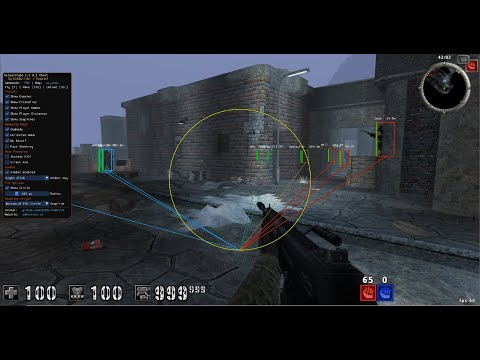
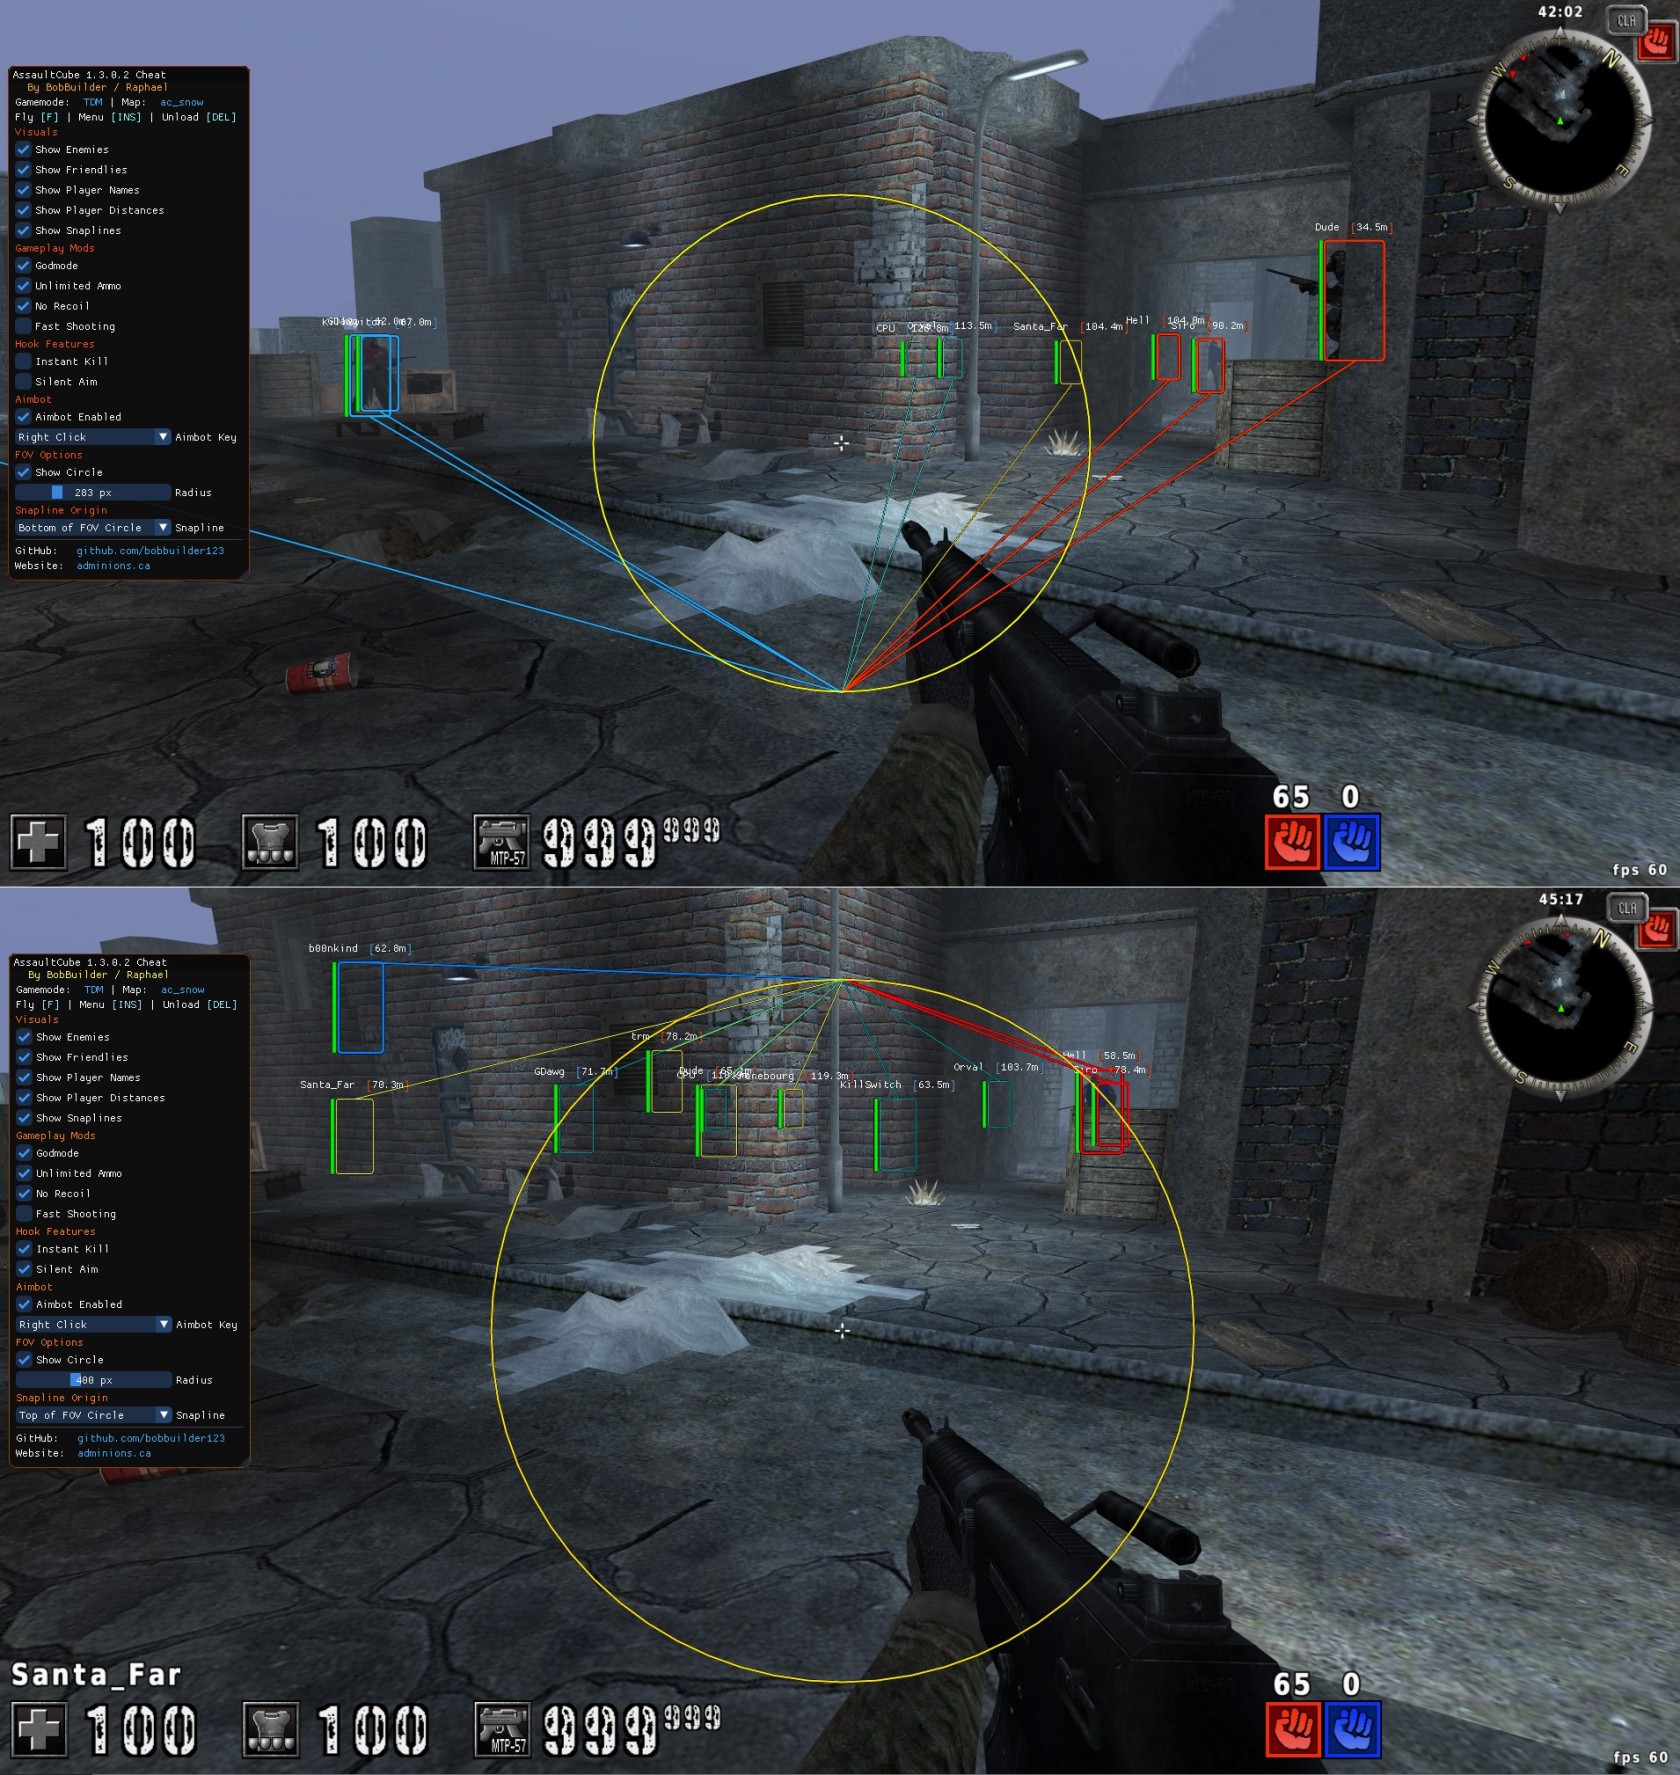
In this guide, we’ll walk step-by-step through building a fully functional internal cheat for AssaultCube v1.3.0.2, with features like ESP ("WallHack"), Aimbot, Noclip, Silent Aim, Instant Kill, No Recoil, Fast Shooting and more. This article is a direct continuation of:
Part 1 – From Reverse Engineering to Cheat Development: External Game Hacks with AssaultCube
If you're new to game hacking or haven't read Part 1, I highly recommend starting there. It covers foundational concepts like memory structure analysis, overlay rendering, and external aimbot logic.
In this second part, we build on that knowledge by moving to internal DLL injection, function hooking, and direct in-engine manipulation for more advanced cheat functionality.
Here’s a short demo of the cheat in action :
Unlike external cheats — which run in a separate process and rely on ReadProcessMemory / WriteProcessMemory — an internal hack is a DLL that runs directly inside the game’s memory space. This offers several major advantages:
- Direct access to internal objects and pointers
- Ability to hook and patch game functions (like damage, spread, or visibility)
- No need for WinAPI memory reads/writes
- Much faster, more stable, and more flexible
- Ability to render visuals using the game's engine, although we won't use AssaultCube's engine in this article (OpenGL). We’ll build this cheat completely from scratch — no pastebin code, no premade engines, and no external dependencies beyond ImGui, MinHook.
What This Article Covers
This article is split into three parts, guiding you from low-level reversing to a fully featured internal cheat with injection:
Part 1: Reversing the Game
We start with IDA Pro, reverse-engineering AssaultCube’s internal logic — including damage calculation, bullet raycasting, movement validation, and player state flags (e.g. noclip or ghost mode). We locate the functions we want to hook and validate the layout of structures like PlayerStruct to ensure correct memory access. This phase is critical for safe and accurate hooking.
Part 2: Writing the Internal Cheat
With the reversed knowledge, we write our cheat as a DLL that runs inside the game. This includes building classes (Player, Weapon) for clean memory access, hooking internal functions (e.g., traceRayToPlayers, playerDamageApplication), and drawing our ESP using ImGui + DirectX9 — even though AssaultCube uses OpenGL. We also implement an animated menu, hotkeys, and toggles.
Part 3: Building the Injector and Loader
Finally, we create a custom DLL injector in C++ that:
- Finds the AssaultCube process
- Allocates memory
- Writes the DLL path into the target
- Creates a remote thread with
LoadLibraryW
If you want to practice (HackTheBox Challenge)
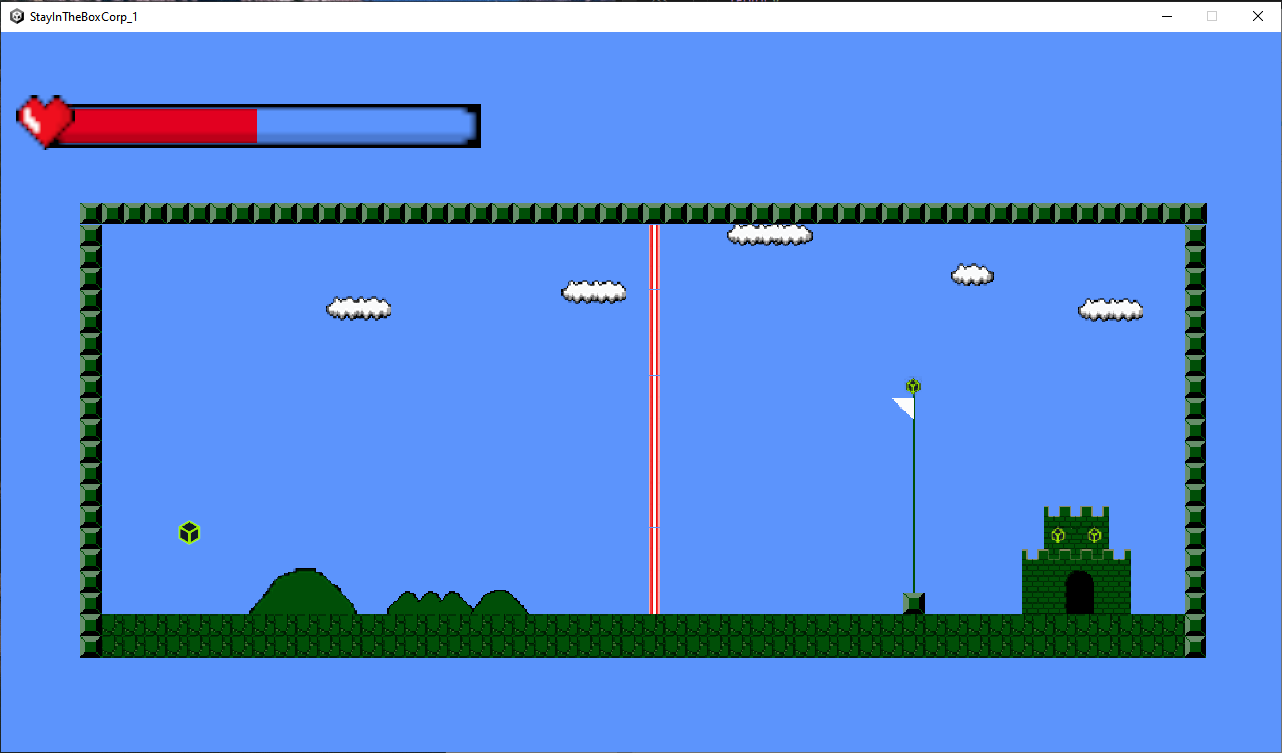
If you want to apply some of the reversing techniques covered in the articles, I created an introductory GamePwn challenge on HackTheBox called StayInTheBoxCorp. It’s a simple 2D game where your goal is to reach the flag while avoiding a laser beam. The game includes a really simply anticheat system, making it a good opportunity to practice analysis and memory manipulation in a controlled environment.
Reversing and Hooking Game Logic Internally
We want to reverse engineer the functions and structures responsible for the key mechanics we want to hook or manipulate: damage application, bullet collision, and player movement.
In this part, we’ll reverse and prepare for:
- Instant Kill (hook damage calculation)
- Silent Aim (redirect bullet collision)
- NoClip (bypass movement collision)
Implementing Instant Kill (Internal)
The instant kill feature allows us to bypass normal damage calculation when we shoot an enemy, making any hit from the local player deal massive or lethal damage instantly. To implement this, we’ll hook the function responsible for applying damage in the game.
Tracing the Damage Flow
We begin at the function that handles hit registration:
.text:004C9F90 → handlePlayerHitEvent(int attacker, int target, ...)
This function is responsible for registering a hit between two players — including sound playback, stat tracking, and damage calculation. Deep into this function, near the end, we find this call:
.text:004CA239 call sub_47D000
So sub_47D000 (playerDamageApplication) is the main function that handles damage math. It eventually calls sub_41C130 (applyDamagePlayer) — this is where the actual health and armor values are modified.
.text:0047D15E                 lea     ecx, [esi+0E8h] ; player+E8 = esi
.text:0047D164                 call    applyDamagePlayer ; function decrease health

This means this is where damage is truly applied to the player’s health — our prime candidate for the instant kill hook.
So the flow is:
traceBulletHit → handlePlayerHitEvent → playerDamageApplication → applyDamagePlayer
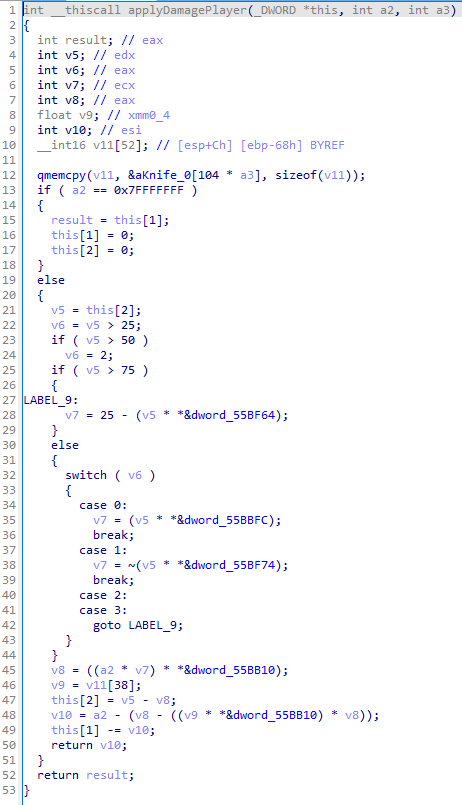
Dissecting applyDamagePlayer @ 0x0041C130
Opening 0x0041C130 in IDA (applyDamagePlayer), we see this prototype:
int __thiscall applyDamagePlayer(void* thisPtr, int weaponDamage, int weaponId);
Let’s go through it carefully.
In the caller:
lea     ecx, [esi+0E8h]
call    applyDamagePlayer
So:
-
esi= attacker player -
[esi+0xE8]= some struct inside the attacker - That struct becomes
this
That means, to get back the attacker player, we can just do:
PlayerStruct* attacker = (PlayerStruct*)((uintptr_t)thisPtr - 0xE8);
Damage Logic
Inside the function, we see math like this:
imul    ecx, esi             ; multiply damage
...
sub     [ebx+4], esi         ; decrease armor
mov     [ebx+8], edx         ; set health = X
And further down:
sub     esi, ecx
sub     [ebx+4], esi         ; subtract final damage from armor
So it’s clearly the one computing how much damage to apply, then updating the player’s health.
Hooking and Overriding Damage
Here’s how we hook and override the behavior using MinHook:
typedef int(__thiscall* tApplyDamagePlayer)(void* thisPtr, int weaponDamage, int weaponID);
tApplyDamagePlayer oApplyDamagePlayer = nullptr;

int __fastcall hkApplyDamagePlayer(void* thisPtr, void* /*edx*/, int weaponDamage, int weaponID) {
    // Recover the attacker from this pointer
    uintptr_t attackerAddress = reinterpret_cast<uintptr_t>(thisPtr) - 0xE8;
    PlayerStruct* attacker = reinterpret_cast<PlayerStruct*>(attackerAddress);
    PlayerStruct* local = *reinterpret_cast<PlayerStruct**>(0x0058AC00);
    if (!attacker || !local)
        return 0;
    if (attacker == local) {
        // We are the attacker → do 999 damage (instant kill)
        weaponDamage = 999;
    } else {
        // Anyone else (bot or enemy) → zero damage (optional godmode)
        weaponDamage = 0;
    }
    // Call the original function with modified damage
    return oApplyDamagePlayer(thisPtr, weaponDamage, weaponID);
}
This is possible in AssaultCube because the damage logic is client-authoritative — the local client runs the game logic, including hits and health.
In modern games, especially with server-authoritative logic, we’d need to modify the client → server communication or target host player logic in P2P setups. But the reversing method remains the same: trace the flow and override values.
Installing the Hook
if (MH_CreateHook(reinterpret_cast<LPVOID>(0x0041C130), &hkApplyDamagePlayer, reinterpret_cast<void**>(&oApplyDamagePlayer)) != MH_OK ||
    MH_EnableHook(reinterpret_cast<LPVOID>(0x0041C130)) != MH_OK) {
    MessageBoxA(nullptr, "Failed to hook applyDamagePlayer", "Instant Kill Error", MB_ICONERROR);
}
Reversing Silent Aim: Hooking traceRayToPlayers
To implement Silent Aim, we need to hijack the part of the game that decides who gets hit by a bullet regardless of where the player is actually aiming.
Unlike aimbot (which moves the player’s crosshair), silent aim lets you fire in any direction and still hit the target of your choice. There’s no camera movement, no flick, no visual giveaway.
Tracing the Hit Logic
When a bullet hits someone, the function handlePlayerHitEvent at 0x004C9F90 is called. We know this from following the call stack during a hit, or from XRefs (cross-references) in IDA on kill/death logic. In the previous article, we had reversed the recoil logic, so we can start from there.
From this function, we know it eventually calls playerDamageApplication, which applies health reduction:
.text:0047D15E                 lea     ecx, [esi+0E8h] ; player+E8 = esi
.text:0047D164                 call    applyDamagePlayer ; function decrease health
That’s the function that applies health reduction. But to implement Silent Aim, we want to hook into how the game decides if a hit occurred in the first place.
XRef to handlePlayerHitEvent → leads to traceBulletHit
From IDA, pressing x on handlePlayerHitEvent, we find this call:
.text:004C9510 traceBulletHit proc near
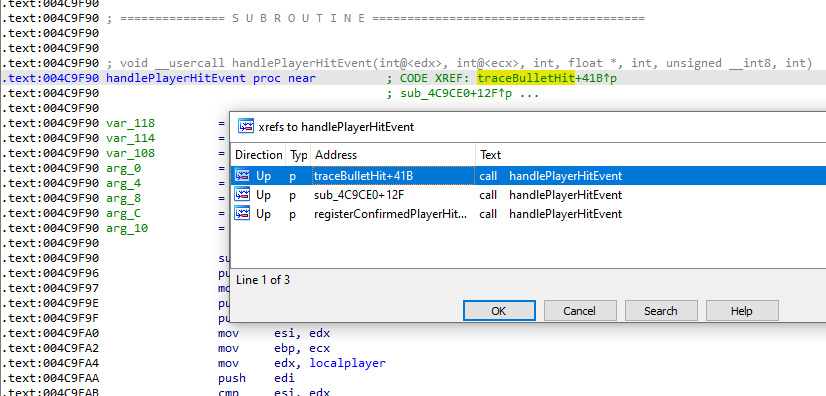
So when we shoot, the bullet first goes through traceBulletHit() which then calls different functions such as the handlePlayerHitEvent, then a traceRayToPlayers (sub_4CA250) function and a registerConfirmedPlayerHit (sub_4C9EE0).
Inside traceBulletHit, we see this line:
lea edx, [esi-8] call sub_4CA250
sub_4CA250 (or traceRayToPlayers) is what determines who the bullet hits If we override this function’s return value, we decide who gets hit, regardless of where we're aiming. This is our main target:
traceRayToPlayers(shooter, rayOrigin, id, outDistance, outTarget, someFlag);
Reversing traceRayToPlayers
Function Prototype: From IDA’s calling convention and stack layout, we infer the signature:
PlayerStruct* __cdecl traceRayToPlayers(
    PlayerStruct* shooter,    // edx
    float* rayOrigin,         // ecx
    int someId,               // [esp+4]
    float* outDistance,       // [esp+8]
    int* outTarget,           // [esp+12]
    char someFlag             // [esp+16]
);
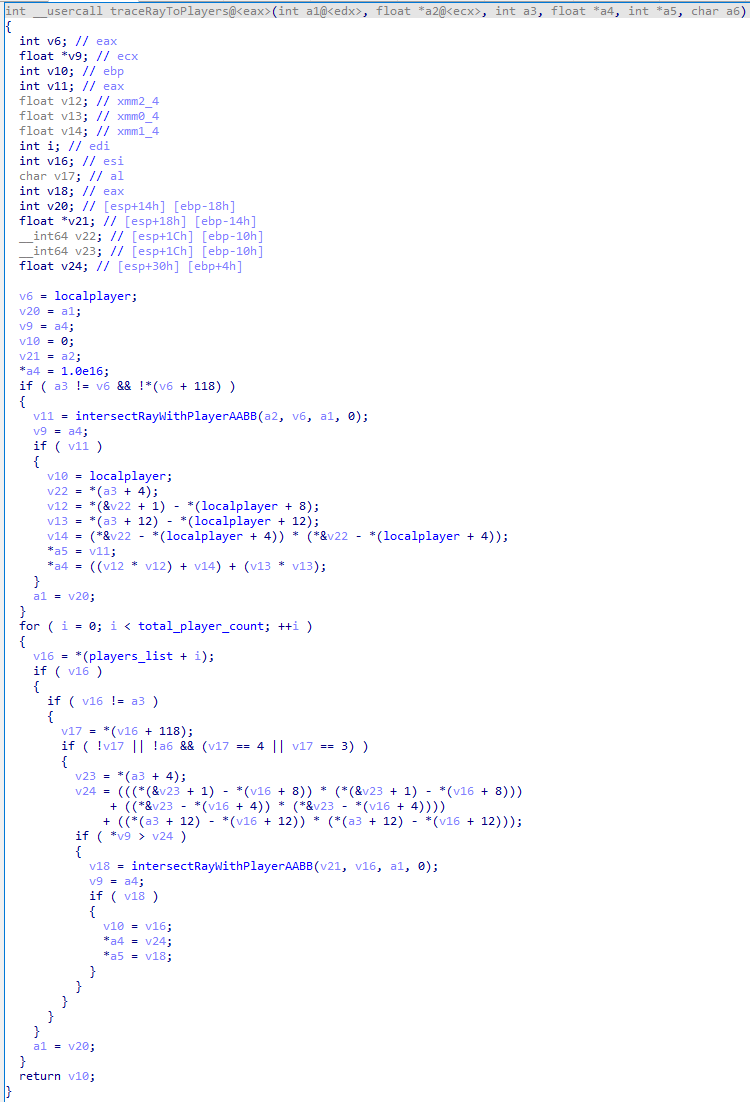
At the top of the function:
cmp     ebx, eax         ; shooter == localplayer? skip
jz      short skipCheck
cmp     byte ptr [eax+76h], 0 ; localplayer dead? skip
jnz     short skipCheck
cmp     al, 3 or 4       ; Not playing or editing? skip
jnz     short skipCheck
...
call    intersectRayWithPlayerAABB
This is a special case check: if the shooter is not the localplayer, the game checks if the bullet hits the localplayer directly. This happens before looping over all players.
If this check passes:
mov     [outTarget], eax
movss   [outDistance], xmm2 ; squared distance
So the function records the localplayer as the current best hit.
The function then loops over all players:
mov     eax, players_list
mov     esi, [eax+edi*4]
For each player:
cmp     esi, ebx         ; ignore self
cmp     [esi+76h], 0     ; must be in playing mode
It filters out: The shooter, Dead players, Players not in active or editing states
Next, it calculates the squared distance between the ray origin and the player's position:
subss   xmm1, [esi+4]    ; dx = ray.x - player.x
subss   xmm2, [esi+8]    ; dy = ray.y - player.y
subss   xmm0, [esi+0Ch]  ; dz = ray.z - player.z

mulss   xmm2, xmm2
mulss   xmm1, xmm1
mulss   xmm0, xmm0
addss   xmm2, xmm1
addss   xmm2, xmm0       ; xmm2 = dx² + dy² + dz²
Then it compares this squared distance to the best-so-far, which ensures only the closest intersected player will be returned:
comiss  xmm0, xmm2       ; if previous hit is closer
jbe     skip             ; skip this player
If the current player is closer, the game performs a precise hitbox check:
call intersectRayWithPlayerAABB
If this returns nonzero:
mov     [outTarget], eax ; store hit player
movss   [outDistance], xmm0
mov     ebp, esi         ; store best player for return
This is the final confirmation that only if the ray intersects the player’s bounding box (AABB), they become the hit target.
At the end of the function:
mov     eax, ebp ; return hit player
retn
The function returns the pointer to the player that was hit, or nullptr if none were intersected.
The Plan
Let’s hook traceRayToPlayers and:
- Check if
shooter == localplayer - If so, override the output to get the list of players, filter only the valid and enemies and return the first. This way, our player will simply hit the first enemy (first player pointer in memory) in the list of players.
- If not, return
nullptr(so bots or enemies never hit anyone)
Hook Code
typedef PlayerStruct* (__cdecl* TraceRayToPlayersFn)(PlayerStruct* shooter, float* rayOrigin, int someId, float* outDistance, int* outTarget, char someFlag);
TraceRayToPlayersFn oTraceRayToPlayers = nullptr;

PlayerStruct* __cdecl hkTraceRayToPlayers(PlayerStruct* shooter, float* ray, int id, float* outDistance, int* outTarget, char someFlag) {
    PlayerStruct* localPtr = *reinterpret_cast<PlayerStruct**>(OFFSET_LOCALPLAYER);
    if (localPtr && shooter == localPtr) {
        Player localPlayer(localPtr);
        auto players = BuildPlayerList(localPlayer);
        for (auto& p : players) {
            if (p.IsValid() && p.IsEnemy(localPlayer)) {
                return p.ptr;
            }
        }
    }
    return 0;
}
This bypasses the game’s ray intersection and tells it directly who we want to hit.
Installing the Hook
MH_CreateHook((LPVOID)0x004CA250, &hkTraceRayToPlayers, (void**)&oTraceRayToPlayers);
Enable it like this:
if (settings.enableSilentAim)
    MH_EnableHook((LPVOID)0x004CA250);
else
    MH_DisableHook((LPVOID)0x004CA250);
NoClip Mode (Set fly = 4)
NoClip is a classic cheat that disables collision detection, letting you fly through walls and terrain. In AssaultCube, this is surprisingly easy to implement, because the game already supports a built-in "fly mode" — used for third-person chase and debug views.
Before diving into reversing player physics or byte-level inspection, we did a classic trick:
Look for meaningful strings in the .rdata section.
Finding Fly Mode Using String Analysis
Using IDA’s string view (Shift+F12), we searched for words like "fly", "ghost", or "chase" — terms commonly used in debug or spectator camera modes.
We landed on this array of string references:
.rdata:0052E9D0 off_52E9D0      dd offset aNone_0       ; "none"
.rdata:0052E9D4                 dd offset aDeathcam     ; "deathcam"
.rdata:0052E9D8                 dd offset aChase1st     ; "chase 1st"
.rdata:0052E9DC                 dd offset aChase3rdO    ; "chase 3rd [O]"
.rdata:0052E9E0                 dd offset aChase3rdA    ; "chase 3rd [A]"
.rdata:0052E9E4                 dd offset aFly          ; "fly"
.rdata:0052E9E8                 dd offset aOverview     ; "overview"
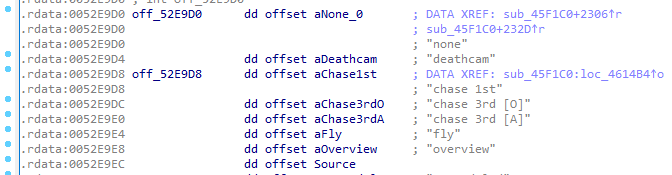 These are view/camera mode labels used by the UI. Immediately, the
 "fly" label stood out — likely tied to NoClip or developer flight.
Tracing Usage of "fly"
Cross-referencing this block brought us to this disassembly around sub_45F1C0, which handles HUD view rendering:
mov     eax, [localplayer+318h]  ; player mode ID
cmp     eax, 4                   ; is it fly mode?
jnz     ...
mov     edx, offset aGhost       ; "GHOST"
...
mov     eax, [localplayer+318h]
mov     ecx, off_52E9D0[eax*4]   ; camera label
This tells us:
- The player struct at
+0x318holds a mode ID - This value indexes into the array of strings:
"none","deathcam","fly", etc.
Verifying 0x76 = Fly Mode
This mode ID isn’t just visual, it's also enforced in core systems like physics and damage.
We later discovered that the true movement mode flag is actually at:
.text:0047D00F  cmp     byte ptr [esi+76h], 0
.text:0047D013  jnz     loc_47D246  ; skip damage
So if the value is non-zero, you can't be damaged. I patched this byte manually at runtime and found:
| Value | Visual View String | Behavior |
|---|---|---|
0 |
none | Normal game mode |
1 |
deathcam | Spectator camera |
3 |
ghost | Debug ghost |
4 |
fly | NoClip — fly freely |
Now we have fly = 4 toggled true NoClip in-engine at player pointer with offset 0x76. |
Player Struct Field
Here’s the relevant part of the PlayerStruct:
struct PlayerStruct {
    ...
    char pad2[0x076 - 0x03C];  // 0x03C → 0x076
    uint16_t fly;              // 0x076
};
Implementing Toggle Key
We want to press a key (e.g. F) to toggle NoClip on or off.
Here's the working code:
// Inside your update or input loop
if (GetAsyncKeyState('F') & 1) {
    PlayerStruct* local = *(PlayerStruct**)OFFSET_LOCALPLAYER;
    if (!local) return;

    if (local->fly != 4) {
        local->fly = 4;
    } else {
        local->fly = 0;
    }
}
This will:
- Set
fly = 4→ enter NoClip mode - Set
fly = 0→ return to normal TheGetAsyncKeyState('F') & 1condition ensures the toggle happens once per key press, not every frame.
Moving to Internal: DLL Injection with DirectX Overlay
Github Repo Internal+Injector While the solution for the cheat built in Part 1 was entirely external, we’ve now transitioned to an internal version. This means our code runs inside the game’s memory space, giving us powerful benefits:
- Direct access to game memory (no RPM/WPM)
- Ability to hook internal game functions like damage and raycasting
- Lower latency for aimbot and recoil control
- More powerful manipulation of game logic (e.g., noclip, silent aim) However, there’s a catch...
AssaultCube Uses OpenGL — But We Avoided It
AssaultCube renders its UI and 3D scene using OpenGL, but since our original project already had a clean DirectX9 overlay with ImGui, I decided to reuse it as an overlay instead of hooking OpenGL directly. Hooking OpenGL (e.g., via wglSwapBuffers) is possible but requires context-aware state management and shader compatibility — not worth the complexity for our needs.
So we inject our DLL into the game, but keep rendering in our own transparent WS_EX_LAYERED window — just like before. No need to detour OpenGL or mess with game rendering state.
External vs Internal: What Changed?
| Feature | External | Internal |
|---|---|---|
| Build target | .exe |
.dll |
| Game memory access | ReadProcessMemory / WriteProcessMemory |
Direct pointer access |
| Rendering | External overlay (DX9) | Same DX9 overlay, but launched internally |
| Input | GetAsyncKeyState() |
Same |
| Aimbot/ESP source | PlayerStruct via RPM |
Directly through PlayerStruct* |
| Hooking | N/A (patch NOPs) | MinHook live detours |
Internal Project Layout
Here’s the final structure of our internal DLL-based AssaultCube cheat:
/AssaultCubeInternal/
├── main.cpp             # DLL entry point and cheat thread loop
├── globals.h/.cpp       # Global constants, settings, game offsets
├── vec.h                # Math structs: Vec2, Vec3, angle math
├── player.h/.cpp        # Player struct wrapper (direct memory access)
├── cheats.h/.cpp        # ESP, aimbot, recoil, noclip, BuildPlayerList()
├── render.h/.cpp        # ImGui overlay using external-style D3D9 window
├── structs.h            # Raw reversed structs: PlayerStruct, WeaponEntry
├── MinHook.h            # Hooking API
├── hook.c               # MinHook internals
├── trampoline.c/.h      # MinHook trampoline infrastructure
├── buffer.c/.h          # MinHook memory allocator
├── hde32.c/.h           # MinHook x86 disassembler
├── imgui.ini            # UI layout for ImGui
├── pstdint.h            # MinHook dependency
├── table32.h            # MinHook dependency
We will inject this DLL into the game using a manual injector with our own custom tool.
Why Keep the External Overlay?
Although we’re now internal, I intentionally kept the overlay external-style. That means:
- We don’t hook OpenGL, which AssaultCube uses for rendering.
- Instead, we render a separate transparent DX9 window, positioned and sized over the game. This keeps our rendering clean, flexible, and avoids tampering with the game’s OpenGL state.
Build Process
- Use Visual Studio
- Project type: DLL
- Configuration:
Release | x86(AssaultCube is 32-bit) - Link against
d3d9.lib
- Include MinHook:
- Add
minhook/*.c/.hfiles to your project - No need for a separate
.lib— it builds from source
- Add
- Inject the resulting
AssaultCubeInternal.dll:- Use any injector
- Target process:
ac_client.exe
Entry Point
Our DLL uses DllMain() to spawn the cheat thread:
BOOL APIENTRY DllMain(HMODULE hModule, DWORD reason, LPVOID) {
    if (reason == DLL_PROCESS_ATTACH) {
        DisableThreadLibraryCalls(hModule);
        CreateThread(nullptr, 0, (LPTHREAD_START_ROUTINE)CheatThread, hModule, 0, nullptr);
    }
    return TRUE;
}
From there, we:
- Initialize MinHook
- Create our DirectX9 overlay window
- Hook internal functions like
traceRayToPlayers(bullet hit detection) andapplyDamagePlayer(health subtraction), using MinHook to overwrite the function prologue with ajmpto our custom logic. - Run the main cheat loop: ESP, aimbot, menu
Inside CheatThread() – Running the Internal Hack
Once our DLL is injected into the game process, execution begins inside DllMain(), which spawns a new thread called CheatThread. This is the true entry point of the cheat — it sets everything up, creates the overlay, enables hooks, and runs the ESP + aimbot loop.
Console and Hook Setup
AllocConsole();
freopen_s(&f, "CONOUT$", "w", stdout);
// ... redirect cerr and cin
We create a debug console to log everything while testing. This makes it easier to debug hooks, read state, and print values during development.
if (MH_Initialize() != MH_OK) return 1;
MH_CreateHook((void*)0x0041C130, &hkDamageCalc, (void**)&oDamageCalc);
MH_CreateHook((void*)0x004CA250, &hkTraceRayToPlayers, (void**)&oTraceRayToPlayers);
This initializes MinHook and sets up two internal detours:
-
hkDamageCalc: for Instant Kill -
hkTraceRayToPlayers: for Silent Aim We don’t enable the hooks yet — that’s toggled later based on user settings.
Overlay Setup (DirectX9)
Even though this is now an internal DLL, we still use our external-style DirectX9 overlay instead of hooking OpenGL.
HWND hwndGame = FindWindow(NULL, L"AssaultCube");
CreateWindowExW(...); // Transparent top-most overlay
Direct3DCreate9(...);
pD3D->CreateDevice(...);
This creates a top-level transparent window and a DirectX9 device for rendering ESP. We also initialize ImGui here:
ImGui::CreateContext();
ImGui_ImplWin32_Init(hwndOverlay);
ImGui_ImplDX9_Init(pDevice);
Main Cheat Loop
The core of the cheat is a while loop that runs until the user presses DELETE:
while (!(GetAsyncKeyState(VK_DELETE) & 1)) {
    // ...
}
Cleanup
After pressing DELETE, we shut everything down cleanly:
ImGui_ImplDX9_Shutdown();
DestroyWindow(hwndOverlay);
MH_Uninitialize();
FreeLibraryAndExitThread(hModule, 0);
Converting the Player Object from External to Internal
In an external cheat, we can’t directly dereference game memory — we have to read and copy it using ReadProcessMemory (RPM). This means we load the game’s player struct into a local copy, and all logic operates on that snapshot:
// External: Build Player from raw pointer
Player::Player(uintptr_t playerPtr) {
    if (playerPtr == 0) return;
    auto temp = std::make_unique<PlayerStruct>();
    if (!RPM(playerPtr, *temp)) return;
    ptr = temp.get();
    internalStruct = std::move(temp);
    address = playerPtr;
}
In the external setup, ptr points to the local copy of the data we just read. So whenever we access health, ammo, team, or anything else, we’re using that snapshot — not live memory.
In an internal cheat, we’re injected directly into the game process — meaning we can safely dereference game pointers and access structs live. No memory copying or RPM is needed:
// Internal: Live pointer to PlayerStruct inside the game
Player::Player(PlayerStruct* playerPtr) {
    if (!playerPtr) return;
    ptr = playerPtr;
    address = reinterpret_cast<uintptr_t>(playerPtr);
}
No copying, no unique_ptr, no RPM. All fields (like ptr->health) directly access real game memory.
Local Player Construction
External:
We don’t know the real address — only the offset — so we read the pointer from memory first, then dereference:
Player localPlayer(OFFSET_LOCALPLAYER, true);
Internal:
We’re already inside the game, so we can just cast the global pointer and pass it directly:
PlayerStruct* localPtr = *reinterpret_cast<PlayerStruct**>(OFFSET_LOCALPLAYER);
Player localPlayer(localPtr);
Injecting the Internal DLL Cheat
Because this version of the cheat is internal, we’re no longer reading or writing memory externally. Instead, we inject a compiled .DLL directly into the game process, and execute our cheat logic from within.
Why Inject?
- Internal cheats run inside the game process.
- This allows for direct memory access without
ReadProcessMemory, faster performance, and easier function hooking (e.g., using MinHook). - It also bypasses some of the limitations of external overlays (like needing window focus or dealing with OpenGL).
Writing the DLL Injector
We wrote a minimal and safe DLL injector in C++. Here's what it does:
-
Finds the process ID (
PID) ofac_client.exe. -
Opens the process with
PROCESS_ALL_ACCESS. - Allocates memory in the game and writes the path to our DLL.
-
Creates a remote thread that calls
LoadLibraryWinside the game to load our cheat DLL.
The Injector Code
DWORD GetProcessID(const wchar_t* exeName);
bool InjectDLL(DWORD pid, const wchar_t* dllPath);

int wmain(int argc, wchar_t* argv[]) {
    const wchar_t* dllPath = L"Path_for_AssaultCubeAimbot.dll";
    const wchar_t* procName = L"ac_client.exe";

    DWORD pid = GetProcessID(procName);
    if (!pid) return 1;

    if (InjectDLL(pid, dllPath)) {
        std::wcout << L"Injection successful.\n";
    } else {
        std::wcerr << L"Injection failed.\n";
    }
    return 0;
}
GetProcessID Function
This scans all running processes using the Toolhelp API until it finds "ac_client.exe":
DWORD GetProcessID(const wchar_t* exeName) {
    HANDLE snapshot = CreateToolhelp32Snapshot(TH32CS_SNAPPROCESS, 0);
    PROCESSENTRY32W entry = { sizeof(entry) };

    while (Process32NextW(snapshot, &entry)) {
        if (_wcsicmp(entry.szExeFile, exeName) == 0) {
            return entry.th32ProcessID;
        }
    }
    return 0;
}
InjectDLL Function
This does the actual injection:
- Allocates space in the remote process for the DLL path
- Writes the string to memory
- Calls
LoadLibraryWin the target process usingCreateRemoteThread
bool InjectDLL(DWORD pid, const wchar_t* dllPath) {
    // Open a handle to the target process with full access rights
    HANDLE hProc = OpenProcess(PROCESS_ALL_ACCESS, FALSE, pid);
    // Calculate the size of the DLL path string in bytes (including null terminator)
    SIZE_T size = (wcslen(dllPath) + 1) * sizeof(wchar_t);
    // Allocate memory inside the target process to hold the DLL path
    LPVOID remoteMem = VirtualAllocEx(hProc, nullptr, size, MEM_COMMIT, PAGE_READWRITE);
    // Write the DLL path string into the allocated memory in the target process
    WriteProcessMemory(hProc, remoteMem, dllPath, size, nullptr);
    // Get the address of LoadLibraryW in kernel32.dll (used to load DLLs)
    FARPROC loadLib = GetProcAddress(GetModuleHandleW(L"kernel32.dll"), "LoadLibraryW");
    // Create a remote thread in the target process that runs LoadLibraryW(remoteMem)
    // This causes the target process to load our DLL from the given path
    HANDLE hThread = CreateRemoteThread(hProc, nullptr, 0,
        (LPTHREAD_START_ROUTINE)loadLib, remoteMem, 0, nullptr);
    // Wait for the remote thread to finish (DLL will be loaded once this returns)
    WaitForSingleObject(hThread, INFINITE);
    // Retrieve the exit code of the thread — this is the return value of LoadLibraryW
    DWORD exitCode = 0;
    GetExitCodeThread(hThread, &exitCode);
    // If the exit code is 0, LoadLibraryW failed
    if (exitCode == 0) {
        std::wcerr << L"[!] LoadLibrary failed inside the game. (exit code = 0)\n";
    }
    // Otherwise, DLL was successfully loaded — show the base address it was loaded at
    else {
        std::wcout << L"[+] DLL loaded at base address: 0x" << std::hex << exitCode << "\n";
    }
    // Cleanup: close the handle to the thread
    CloseHandle(hThread);
    // Free the memory we allocated inside the target process
    VirtualFreeEx(hProc, remoteMem, 0, MEM_RELEASE);
    // Close the handle to the target process
    CloseHandle(hProc);
    // Return true if the injection succeeded (non-zero base address), false otherwise
    return exitCode != 0;
}
Usage Instructions
- Compile your cheat as a
DLL(e.g.,AssaultCubeAimbot.dll) - Compile this injector as a console EXE (
Injector.exe) - Run the game first
- Then run the injector:
Injector.exe
Conclusion
This internal cheat for AssaultCube was created as a technical learning exercise, not as a tool for disruption. It builds on the concepts introduced in the external version — memory structures, game logic, overlays — and adds deeper access through function hooks, injected logic, and direct memory manipulation.
By writing our own DLL and injecting it into the game, we unlocked powerful capabilities:
- Hook core gameplay functions like damage calculation and ray tracing
- Modify weapon behavior, recoil, and ammo directly in memory
- Render custom overlays using ImGui and DirectX9
This project demonstrates how internal cheats work at a low level — without relying on external tools, and while remaining stable and consistent across game restarts.
Just like the external guide, this project is for educational purposes only. The goal is to demystify game hacking and help readers understand memory, reverse engineering, and runtime logic — all within a responsible offline sandbox.
As always, feel free to:
- Watch the companion YouTube video for a walkthrough
- Leave questions or suggestions on the GitHub Repo
- Share your own tweaks or contributions
If you’ve followed this far, thanks for reading — and happy hacking (ethically)!
- BobBuilder / Raphaël
Copyright © 2025 ADMinions.ca. This work is licensed under the CC BY-SA 4.0 license.