
Part 1 - From Reverse Engineering to Cheat Development: External Game Hacks with AssaultCube
Introduction
In this guide, we'll walk step-by-step through the process of building a functional external cheat (ESP/"WallHack" and Aimbot) — for the game AssaultCube (v1.3.0.2).
Here is a quick youtube demo of the cheat made in this article:
https://www.youtube.com/watch?v=cWaQgsfLquk
The goal is to show how we can reverse the game’s data structures using the disassembler IDA, extract useful information like player positions, view angles, and visibility flags, and then use that information to draw visuals and assist aiming from an external application. This is not designed to bypass any anticheat systems, and the techniques here are for educational purposes on a non-protected game, playing against bots. Please do not attempt on a multiplayer game.
This article isn’t based on any existing project or online reference. Everything here was done from scratch, step by step, with the goal of understanding exactly how and why each part of the cheat works. You don’t need advanced reversing experience to follow along, but if you have some basic understanding of C++, Assembly, Linear Algebra/Trigonometry and an interest in how games work under the hood, you’ll be able to understand the concepts in this article.
What This Article Covers
This article is split into three parts:
-
Part 1: Key Concepts
Before touching any disassembler or C++ code, we cover how 3D games represent players, space, and the camera. These concepts — world coordinates, view angles, projection — are the foundation of every cheat you’ll build. -
Part 2: Reversing the Game
We dump the game binary, load it into the disassembler IDA, and identify the memory structures we need — like the local player pointer, player list, view matrix, visibility flags, and recoil logic. Along the way, we reconstruct C++-like structs from the game’s raw memory layout. -
Part 3: Writing the Cheat
Using everything we reversed, we write an external cheat in C++. We'll attach to the game process, read memory safely, and use the view matrix to project 3D positions to 2D screen coordinates. From there, we render ESP visuals and implement an aimbot with yaw/pitch control. Bonus features like godmode, no recoil, and infinite ammo are also included.
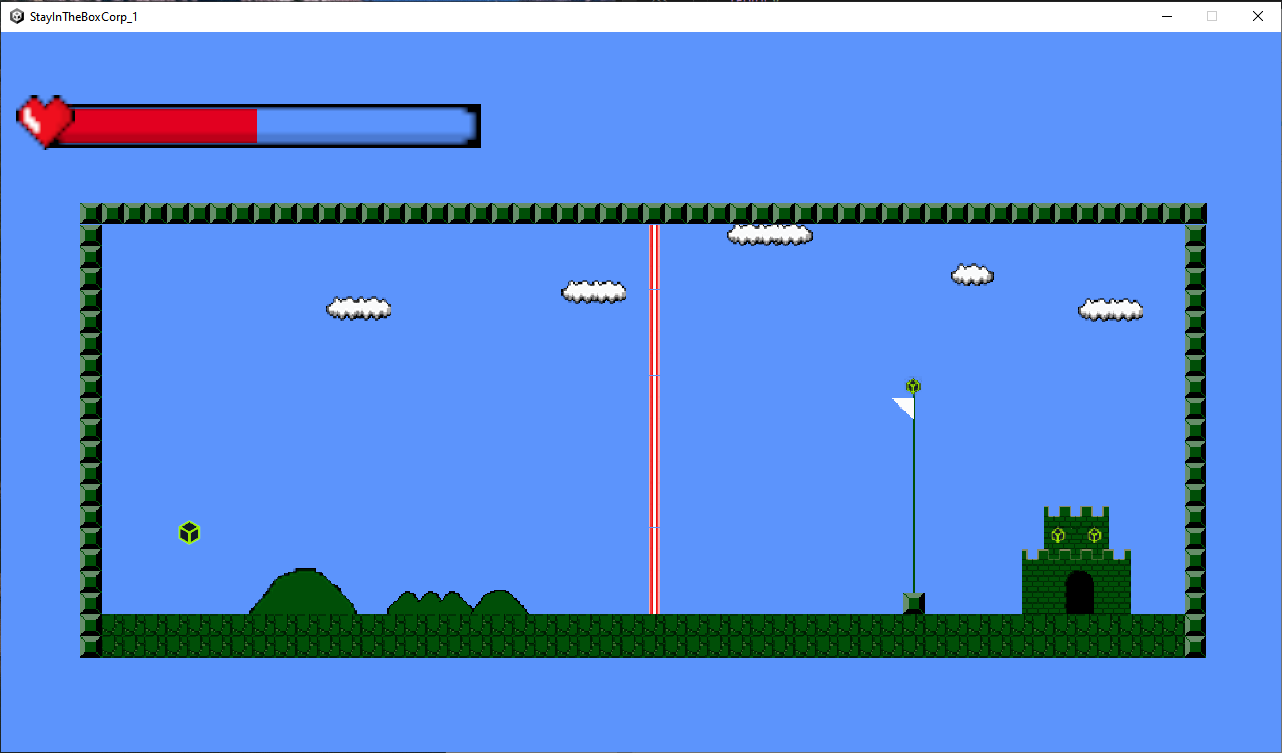
HackTheBox Challenge
If you want to apply some of the reversing techniques covered in this guide, I created an introductory GamePwn challenge on HackTheBox called StayInTheBoxCorp. It’s a simple 2D game where your goal is to reach the flag while avoiding a laser beam. The game includes a really simple/weak anticheat system, making it a good opportunity to practice analysis and memory manipulation in a controlled environment.
Key concepts
Before you can write a single line of an aimbot or ESP, you need to understand how a 3D game actually works under the hood. I’m not talking about programming yet — I’m talking about how the game thinks about space, positions, and the camera.
Everything your cheat does — whether it’s drawing a box around an enemy or snapping your aim toward their head — is based on the same few principles. So let’s go over them clearly and simply.
World Coordinates: How Games Place Everything
Every object in a game exists in a 3D world. When the game places a player, a wall, or a bullet, it gives them a position made up of three numbers:
- X: left and right
- Y: forward and backward
- Z: up and down
This is called a world coordinate. It's basically the game saying:
"This thing is 100 units to the right, 50 units forward, and 2 units above the ground."
For example, the following Vec3 (vector of 3 floats or vector 3D) tells the engine where to render the player, calculate physics, and check collisions.
Vec3 position = { 100.0f, 50.0f, 2.0f };
ESP and aimbot features depend on reading these 3D positions from memory. You’ll be accessing a struct like player->positionHead, and that’s a world-space coordinate.
The Camera: The Player’s Eyes Into the World
Now here’s the catch: the player isn’t looking at the entire world at once. The game has a camera, and only what’s in front of the camera is drawn on screen. Think of the camera like your eyeballs in the game. It has a position (where you are standing), and two angles:
- Yaw: left/right rotation (like turning your head)
- Pitch: up/down rotation (like looking up or down)
Together, these define what you see. But the game needs to do more than just know where you are looking — it needs to convert every 3D position in the world into a 2D pixel on your screen. That’s where the view matrix comes in.
The view matrix is a 4×4 matrix the game uses to transform world positions into camera-relative positions. Then it runs those through a projection step to get final 2D screen coordinates. You need the view matrix if you want to draw ESP boxes at the right place. If you don’t project the world coordinates through this matrix, your drawings will appear in the wrong spot or offscreen entirely.
From 3D to 2D: The Secret Behind ESP Boxes
Let’s say you want to draw a box on top of an enemy’s head. You have their 3D position — something like:
Vec3 headPos = { 120.5f, 42.0f, 5.5f };
That’s a world-space coordinate. It tells the game engine where the player is standing in 3D space. But if you want to draw a box on the screen, that’s not enough — your monitor is 2D. So how does the game go from 3D world coordinates to 2D screen pixels? That’s what the view matrix is for.
Here’s what happens, step by step:
- The game multiplies the 3D world position by the view matrix — a 4×4 transformation matrix that adjusts the point relative to your camera's perspective.
- The result is a new 4D vector (x, y, z, w). This fourth value (w) is part of a process called homogeneous coordinates. It’s used to handle perspective — so objects farther away appear smaller.
- To get the final screen position, you divide x and y by w. This is called perspective division (This step makes sure the farther the object is, the smaller and less distorted it looks):
screenX = x / w; screenY = y / w; - Finally, the game maps that position to your actual screen size — from normalized device coordinates (−1 to +1) into pixels.
This whole process is called WorldToScreen projection. It’s how you go from:
Vec3 worldPos = { 120.5f, 42.0f, 5.5f };
to:
Vec2 screenHead = { 432.0f, 210.0f };
Now you know: “That enemy’s head is at pixel (432, 210) on screen. I’ll draw a box there.”. Every single visual in your cheat — ESP boxes, health bars, snaplines — starts with this projection. If you don’t understand the math behind it, your visuals will never align with the game.
Reversing
Before we can write a single line of cheat code, we need to reverse-engineer the game to extract useful memory addresses and structures. This process is usually done on a dumped version of the game, which is a copy of the game’s memory saved to disk, so we can analyze it statically in disassembler tools such as IDA.
As mentionned previously, we’ll be reversing the game AssaultCube v.1.3.0.2 using this method.
Dumping the Game Binary
The first step is to dump the game’s memory while it’s running. For this, we’ll use x32dbg, a 32-bit debugger that works great with older games like AssaultCube. Here’s how to do it:
- Launch AssaultCube normally and start a game (single-player is fine).
- Open x32dbg and attach it to
ac_client.exe. - Use the
Scyllaplugin (built into x32dbg) to dump the process:- Go to Plugins → Scylla → Dump PE.
- Save the dumped executable somewhere as
dumped_ac.exe.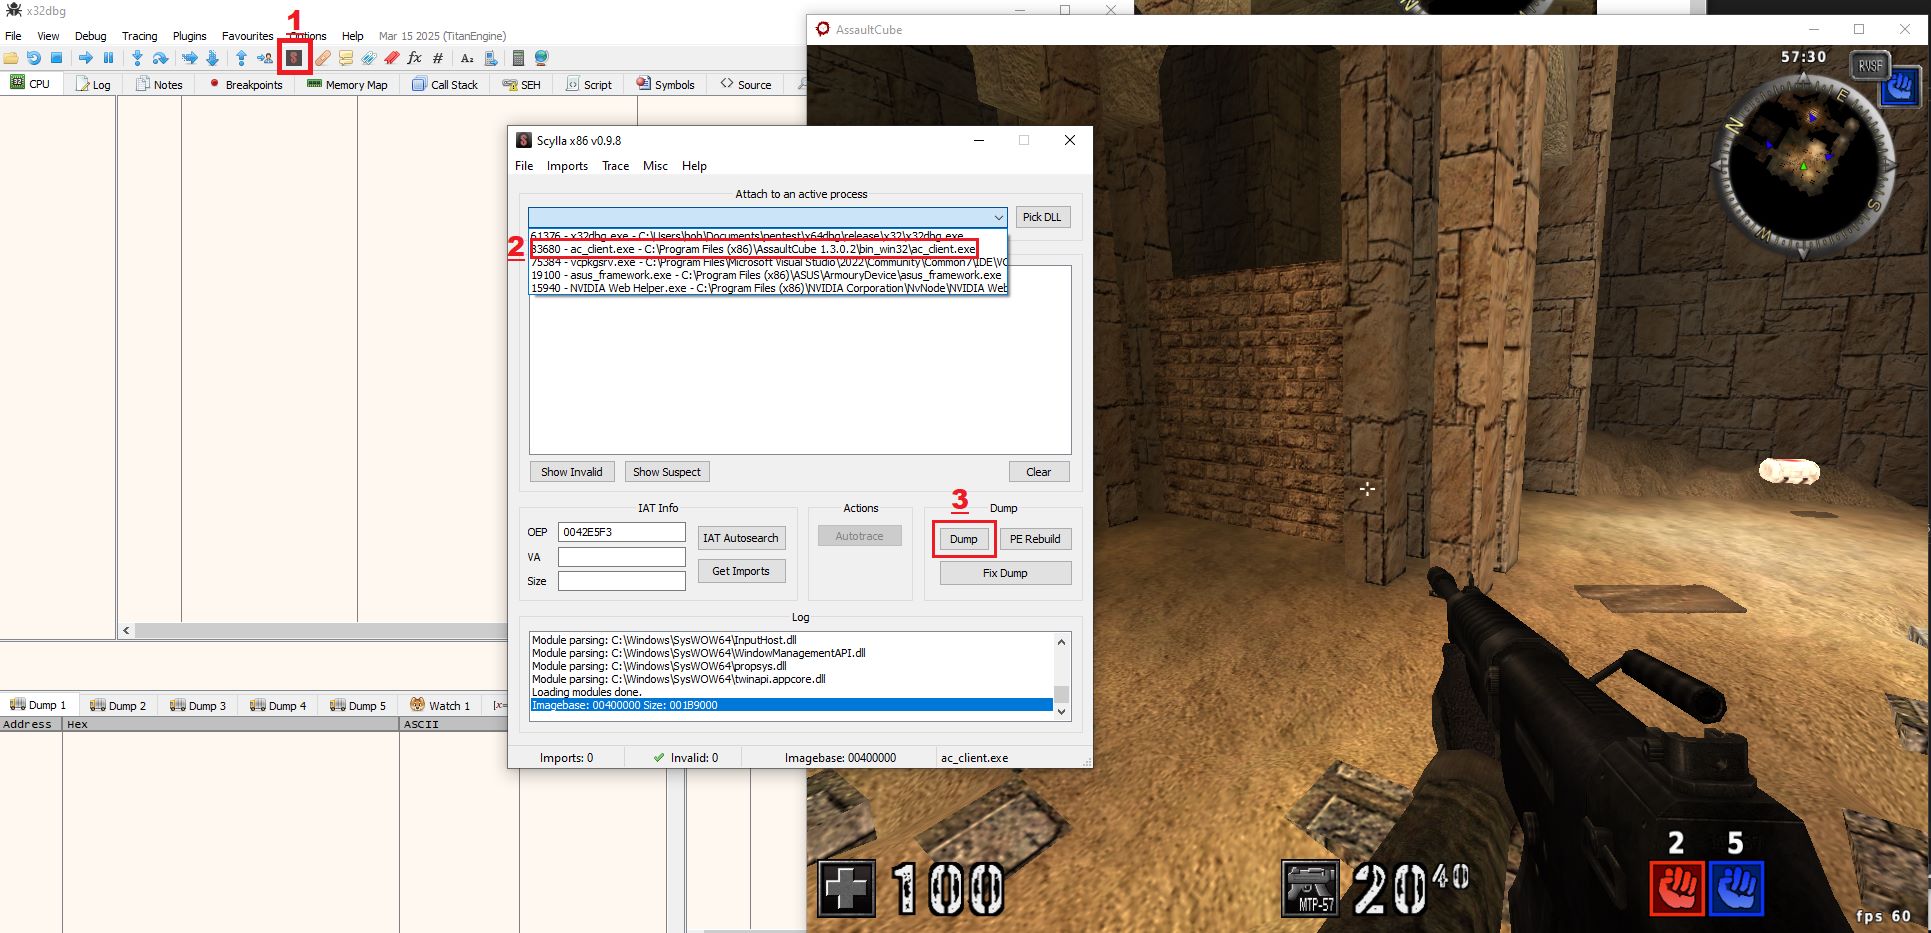
Finding Entities and Player Structure
Search with string references
When you're beginning to reverse a game for ESP or aimbot purposes, one of the most important early goals is to find where the game stores its list of players. This includes where each player struct is stored in memory, and how many players are currently in the game.
A simple and reliable way to get started is to use string references inside IDA. These are often breadcrumbs that lead to game logic involving commands, debug info, or in-game objects.
We start by opening the string view (Shift+F12) and searching for a term like:

player
We spot this entry in .rdata:

.rdata:0054C444 aPlayer db 'player',0
This string has one cross-reference (xref), which leads us here:
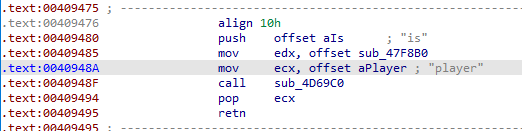
.text:00409480                 push    offset aIs      ; "is"
.text:00409485                 mov     edx, offset sub_47F8B0
.text:0040948A                 mov     ecx, offset aPlayer ; "player"
.text:0040948F                 call    sub_4D69C0
This is a registration or dispatch setup. The game is associating the string "player" with the function sub_47F8B0. This handler is likely meant to handle in-game commands or debugging functionality tied to players. Let’s take a look at that function.
Analyzing sub_47F8B0 – Player Handler
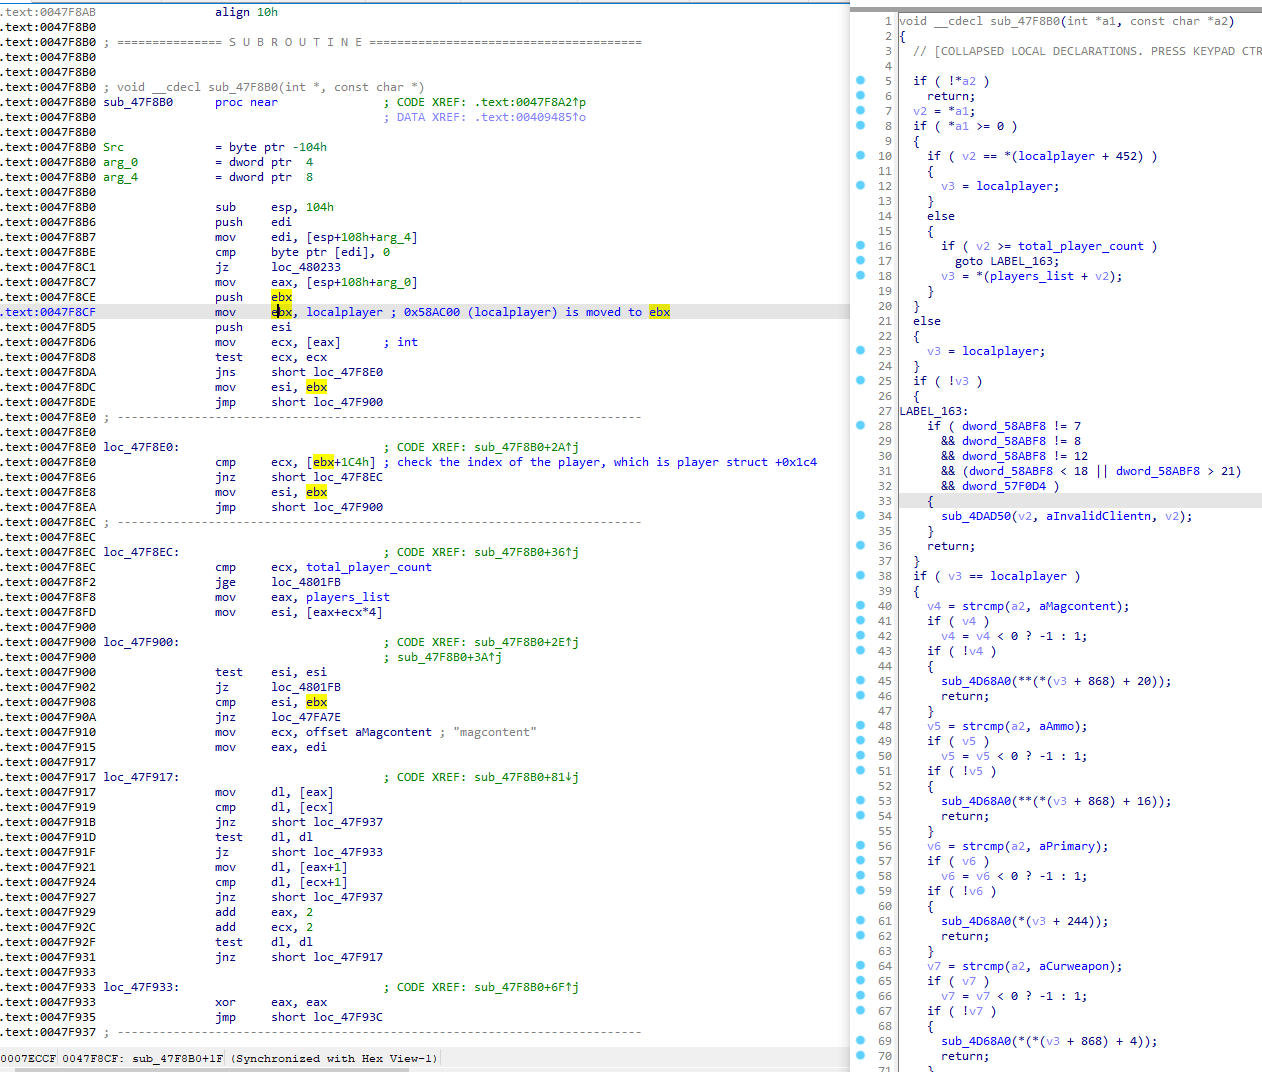
Here’s where things get useful. sub_47F8B0 begins like this:
mov     ebx, dword_58AC00     ; localplayer pointer
mov     ecx, [eax]            ; player index (from command args)
cmp     ecx, [ebx+1C4h]       ; compare to localplayer field
cmp     ecx, dword_58AC0C     ; compare to total player count
mov     esi, [dword_58AC04 + ecx*4] ; player pointer from array
What’s happening here is classic index validation logic:
-
ebxloads the pointer to the local player struct fromdword_58AC00 -
ecxis an index (player ID) coming from the command arguments - The game compares that index to:
- a localplayer internal field at offset
+0x1C4(some kind of player validation) - a global value at
dword_58AC0C, which represents the max player count
- a localplayer internal field at offset
- If it's in bounds, it then uses the index to read a pointer from a list at
dword_58AC04 + ecx * 4
From this, we deduce the following:
constexpr uintptr_t OFFSET_LOCALPLAYER = 0x0058AC00;
constexpr uintptr_t OFFSET_NUMPLAYERS  = 0x0058AC0C;
constexpr uintptr_t OFFSET_PLAYERLIST  = 0x0058AC04;
-
OFFSET_LOCALPLAYERis a pointer to the player you control -
OFFSET_NUMPLAYERSholds an integer: number of players currently in-game -
OFFSET_PLAYERLISTis a pointer to an array of player pointers (PlayerStruct*)
Verifying in Cheat Engine
Once you identify these, it’s a good idea to verify them using Cheat Engine or ReClass.
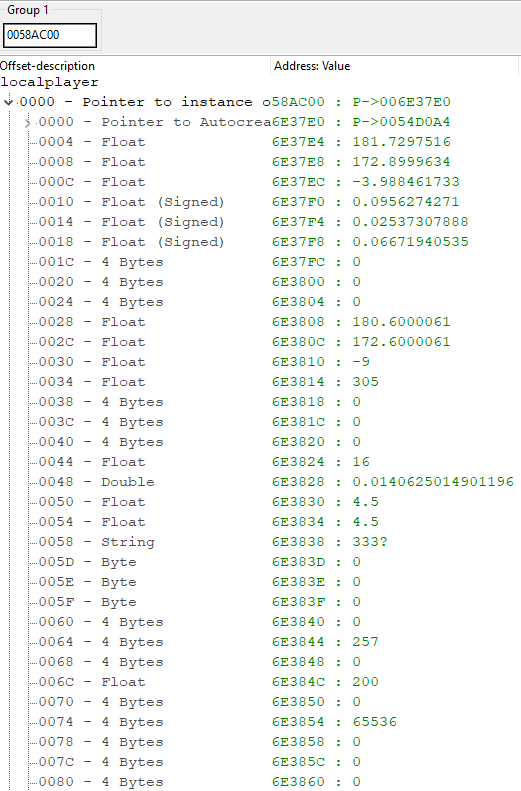
Here we have OFFSET_PLAYERLIST which points at 0x58AC04. Dereferencing it gives you an array of PlayerStruct*. We see 15 valid pointers (offset 0x004 to 0x3C), one for each other player (in this case, 16 players total: 8 vs 8).
 Here we have
 OFFSET_NUMPLAYERS which points at 0x58AC0C. The value should match the number of players in-game (e.g. 12 for a 6v6 match).
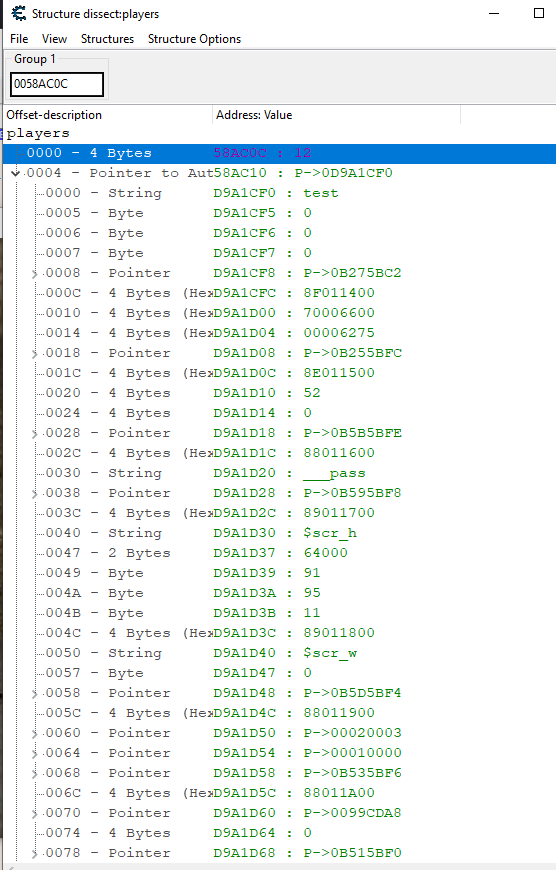
Here we have OFFSET_LOCALPLAYER which points at 0x0058AC00. We should find a pointer to our own player struct PlayerStruct*, and inside, fields like your name and health.
Reconstructing the Player Structure
In the same function, sub_47F8B0, we can follow how the engine accesses fields of each player. Most of the time, it does this:
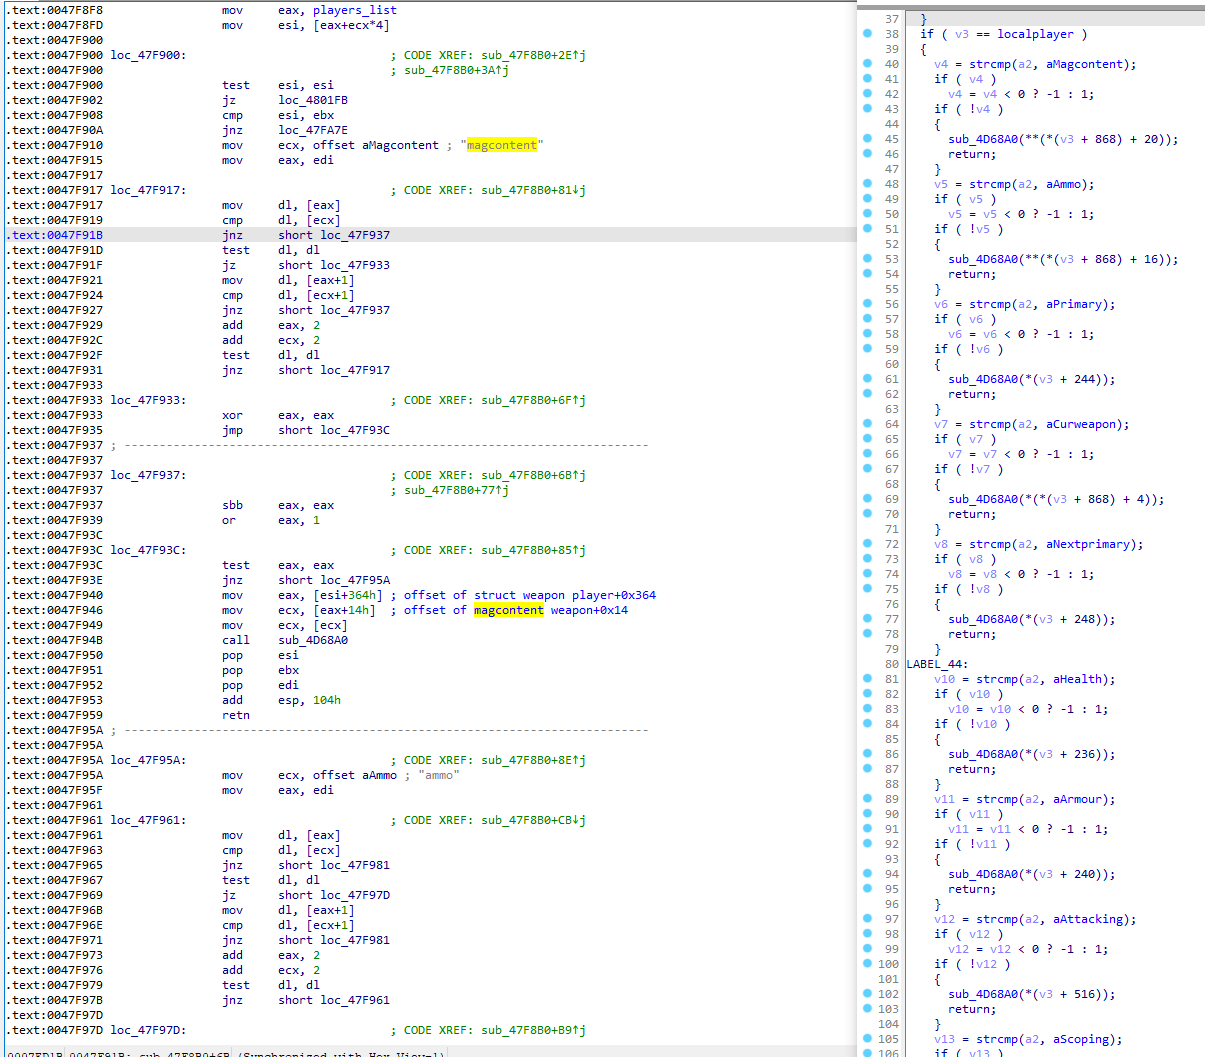
mov     esi, [players_list + ecx * 4] ; current player is in esi
...
mov     ecx, offset aMagcontent ; "magcontent"
...
mov     eax, [esi + 364h]             ; weapon pointer
mov     ecx, [eax + 14h]              ; magazine content
...
mov     ecx, offset aAmmo ; "ammo"
...
mov     eax, [esi+364h]             ; weapon pointer
mov     ecx, [eax+10h]              ; weapon ammo count
Here, the function is clearly accessing:
- Player + 0x364 → current weapon pointer
- Weapon + 0x10 → ammo value
- Weapon + 0x14 → magazine value
A few instructions later, we see:
mov     ecx, offset aHealth ; "health"
mov     ecx, [esi+0ECh]

mov     ecx, offset aArmour ; "armour"
mov     ecx, [esi+0F0h]

mov     ecx, offset aTeam_1 ; "team"
mov     ecx, [esi+30Ch]

mov     ecx, offset asc_54C3D0 ; "x"
movss   xmm0, dword ptr [esi+4]

mov     ecx, offset aY  ; "y"
movss   xmm0, dword ptr [esi+8]

mov     ecx, offset aZ  ; "z"
movss   xmm0, dword ptr [esi+0Ch]
So, we also find string lookups for "player position", "curweapon", "ammo", "health", "armour", etc., each followed by relevant pointer math and field access.
Putting It All Together
Based on the disassembly, we can now draft the core of the PlayerStruct:
struct Vec3 { float x, y, z; };

struct PlayerStruct {
    DWORD32 vftable;        // 0x000
    Vec3 position;          // 0x004
    char pad1[0x0EC - 0x010];
    int health;             // 0x0EC
    int armor;              // 0x0F0
    char pad5[0x11C - 0x0F4];
    int unknown11C;         // 0x11C
    char pad6[0x140 - 0x120];
    int unknown140;         // 0x140
    char pad7[0x1DC - 0x144];
    int frags;              // 0x1DC
    char pad8[0x1E4 - 0x1E0];
    int deaths;             // 0x1E4
    char pad9[0x205 - 0x1E8];
    char name[16];          // 0x205
    char pad10[0x30C - (0x205 + 16)];
    int state;              // 0x30C
    char pad11[0x33C - 0x310];

	 WeaponEntry* knife;           // 0x33C
	 WeaponEntry* pistol;          // 0x340
	 WeaponEntry* carbine;         // 0x344
	 WeaponEntry* shotgun;         // 0x348
	 WeaponEntry* subgun;          // 0x34C
	 WeaponEntry* sniper;          // 0x350
	 WeaponEntry* assault;         // 0x354
	 WeaponEntry* grenade;         // 0x358
	 WeaponEntry* akimbo;          // 0x35C
	 WeaponEntry* currentWeapon;   // 0x360
	 WeaponEntry* lastWeapon;      // 0x364
	 WeaponEntry* nextWeapon;      // 0x368
	 WeaponEntry* altWeapon;       // 0x36C
	 WeaponEntry* swapWeapon;      // 0x370
	 WeaponEntry* maybeUnused;     // 0x374
};
Alternative Method: Validating localplayer via Camera Setup
While we already found the localplayer pointer through gameplay command analysis, it's always a good idea to validate critical offsets using an unrelated part of the code. In this case, we’re going to validate the localplayer pointer by examining how the game sets up its camera for rendering.
Games using OpenGL often use glOrtho or glLoadMatrixf to configure the projection matrix. These functions are usually called every frame before rendering the scene. Since the view depends on the local player's position and state, we can often find references to localplayer in these camera setup functions.
Find OpenGL Projection Function
In this game, the camera matrix is built and sent to OpenGL via a call to:
glOrtho(left, right, bottom, top, zNear, zFar);
By searching for glOrtho in the Names subview in IDA (Shift+F4), we find a relevant function:

sub_457570
This is a function in the game that calls glOrtho. It appears to be responsible for setting an orthographic projection — the camera’s internal setup. This makes it a strong candidate to look for localplayer.
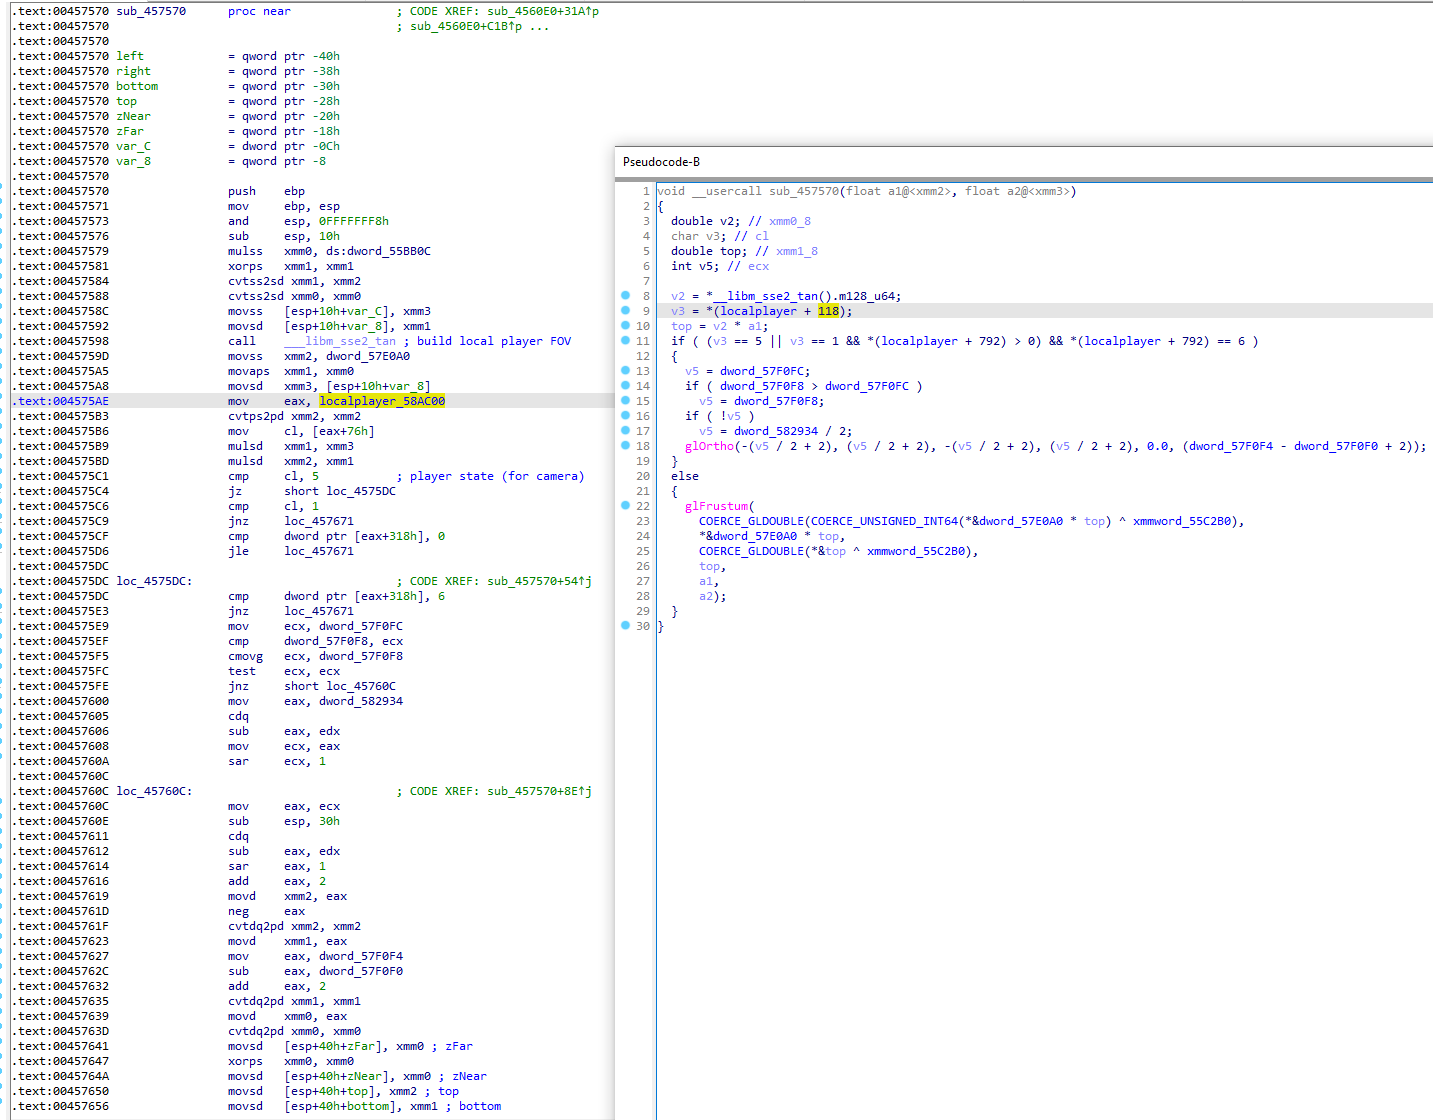
Here is the beginning of the function:
.text:00457570 sub_457570 proc near
...
.text:004575AE mov     eax, dword_58AC00
.text:004575B6 mov     cl, [eax+76h]
.text:004575CF cmp     dword ptr [eax+318h], 0
We can clearly see that this function:
- Loads
dword_58AC00which is localplayer intoeax - Accesses player fields like
[eax+76h]and[eax+318h] - Then calls
glOrthowith calculated camera dimensions
Verifying in Cheat Engine
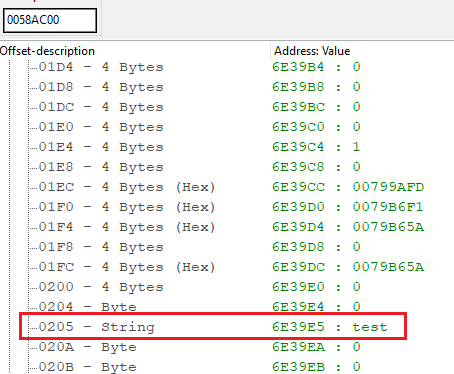
To verify this at runtime, you can dump the pointer at 0x58AC00 and check if the player structure it points to contains your player name (at offset 0x205) or other known values like health or ammo. If you're standing still in a known position, you can also confirm the 3D coordinates.
We confirm by viewing offset 0x205, which should be our player's name (test in this case):
Finding View Angles (Pitch and Yaw)
After mapping out the player structure and confirming the localplayer pointer, our next step is to identify where the game stores the camera orientation — specifically, the horizontal and vertical angles that determine where the player is aiming.
These are usually called:
- Yaw — horizontal rotation (left/right), like turning your head left or right.
- Pitch — vertical rotation (up/down), like looking up at the sky or down at your feet.
If we want to build an aimbot that automatically adjusts the player’s aim, we’ll need to write values to these angles in memory. So first, we have to find where they live.
Looking for Usage of View Angles
We already found the localplayer pointer at 0x58AC00, so to find the yaw and pitch, we search for any code that accesses the variable. This gives us cross-references (xrefs) to every place in the code that reads or writes the localplayer struct:
 One of the most interesting references appears in the function at
 0x00423FE0.
 Toward the end of this function, we find the following disassembly:
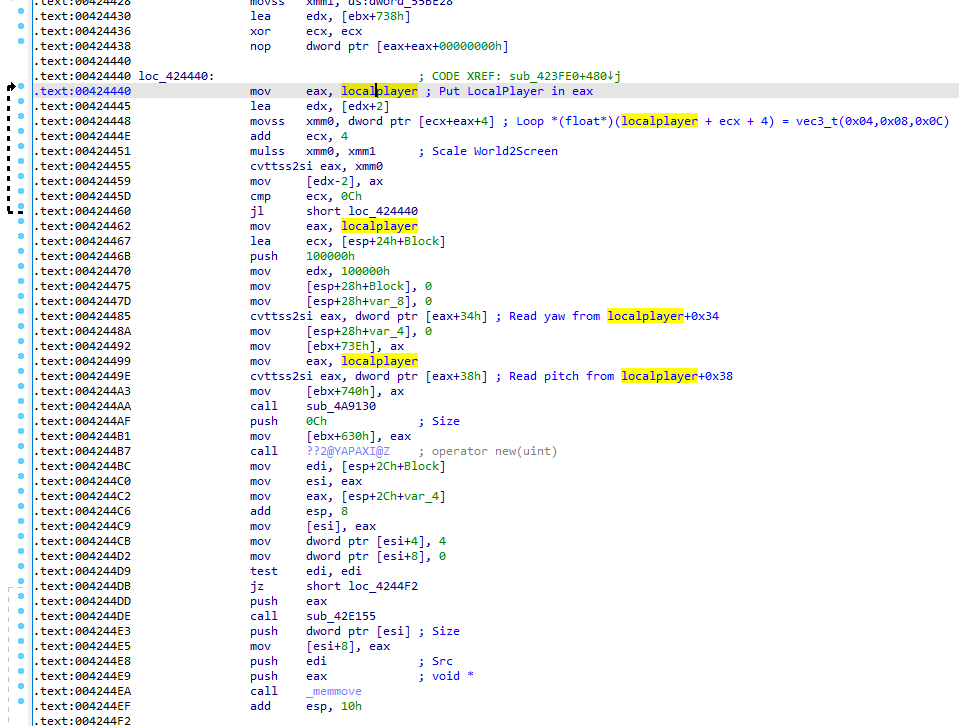
.text:00424485    cvttss2si eax, dword ptr [eax+34h] ; Read yaw
.text:00424492    mov       [ebx+73Eh], ax
.text:00424499    mov       eax, localplayer
.text:0042449E    cvttss2si eax, dword ptr [eax+38h] ; Read pitch
.text:004244A3    mov       [ebx+740h], ax
Here’s what this code is doing:
- It loads the
localplayerpointer intoeax - Then it reads
floatvalues at[localplayer + 0x34]and[localplayer + 0x38] - These are converted to integers (just for display or UI purposes) and written into another structure
TLDR: the game is reading the actual angles used to aim and converting them to be displayed.
Updating Our Player Structure
Based on this, we can safely update our PlayerStruct definition to include the view angles:
struct PlayerStruct {
    DWORD32 vftable;        // 0x000
    Vec3 position;          // 0x004
    char pad1[0x028 - 0x010];
    Vec3 positionFeet;      // 0x028
    float yaw;              // 0x034
    float pitch;            // 0x038
    // ... rest of the struct
};
With these fields in place, we can now read or write the view direction of the player directly. This is exactly what you’ll do when writing an aimbot.
Reversing the Player View Matrix
To draw anything in 3D — like a box on a player's head — you need to know where that player is on screen. And to go from 3D world coordinates to 2D screen space, the game uses a view matrix: a 4×4 float matrix that projects the 3D world into camera space. As mentionned in the section Key concepts, this matrix is used by the game to render the scene. So if we can find where it's built or stored, we can re-use it for our cheat to correctly draw ESP visuals that match the game’s camera.
How Games Use the View Matrix
In OpenGL-based games (like AssaultCube), the view matrix is typically passed to the renderer through:
glLoadMatrixf(float* matrix);
This tells the GPU to load a matrix into the current transformation state, which affects how all 3D geometry is projected onto the screen.
Finding the Matrix in IDA
We start by searching for references to glLoadMatrixf using the Names subview in IDA (Shift+F4) in IDA. We quickly find one:
.text:004FB1DB call glLoadMatrixf
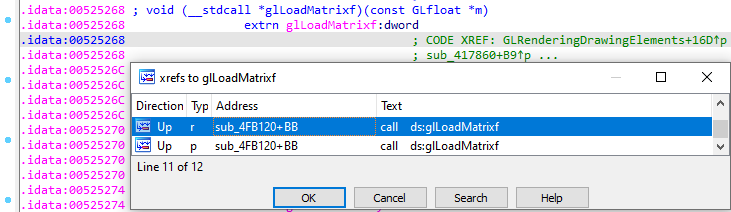 This is inside the function
 sub_4FB120. Let’s break this down.
Analyzing sub_4FB120
At the top of the function:
movups xmm0, xmmword_57DFD0
movups [esp+40h+m], xmm0
This is our first hit.
- It reads 4 floats from memory address
0x57DFD0— this is the first row of the matrix. - Then it loads the next rows from:
-
0x57DFE0 -
0x57DFF0 -
0x57E000
-
So this block of memory holds the full 4×4 matrix (16 floats, 64 bytes). That’s the full projection matrix the game uses to transform 3D world positions into screen coordinates.
Later in the function, the code modifies the matrix slightly using some math (it scales certain elements). This is most likely to handle field of view or aspect ratio correction.
Then finally:
lea     eax, [esp+40h+m]
push    eax
call    glLoadMatrixf
The final matrix is pushed onto the stack and passed directly into OpenGL’s rendering pipeline.
From the above, we can now define the view matrix base address in our cheat:
constexpr uintptr_t OFFSET_VIEWMATRIX = 0x57DFD0;
This gives us a pointer to the the viewmatrix used by the game each frame. Reading this from memory will allow us to accurately project any 3D position (like player->positionHead) to a 2D Vec2 pixel on screen.
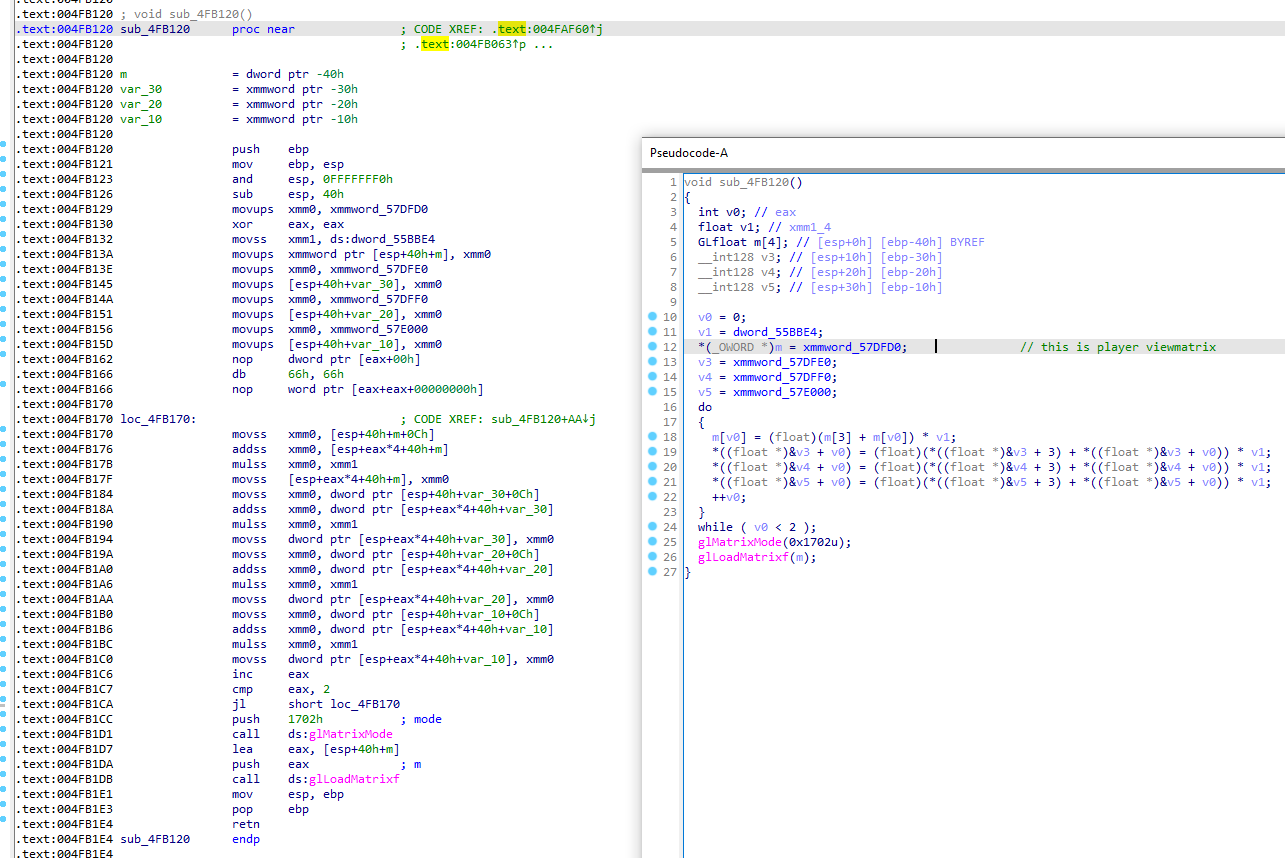
Validating ViewMatrix in Cheat Engine
To validate this in practice, you can open Cheat Engine, add the address 0x57DFD0 as a float[16], and watch how the values behave in real-time. This will confirm that the matrix is being updated every frame based on the camera’s orientation and is exactly what we want for projecting 3D coordinates to screen space. While in-game:
- Move the camera left/right and up/down → you’ll see the matrix values constantly changing.
- Stop moving → the values freeze.
- Look left/right → some floats change (yaw-related).
- Look up/down → different values shift (pitch-related).
Reversing Player Visibility
One of the most important ESP and aimbot features is being able to tell whether a player is actually visible — in other words, whether they are on screen and not behind a wall or object (from our player's point of view). If we don’t have a way to detect visibility, we’ll end up drawing ESP boxes for players hiding behind cover, or our aimbot will try to aim at targets we can’t see. In many games, visibility is determined through raycasts or stencil buffers, but in this case, we will use per-frame visibility tracking.
How Visibility Works Internally
Every time a frame is rendered, the engine evaluates each player and determines whether they should be drawn or not. Internally, the game keeps track of:
- A global frame counter, which increments every frame.
- A last visible frame for each player, which records the last time that player was confirmed visible.
So if the current frame is 1000, and a player’s last visible frame was 999, that means they were visible last frame. If it was 960, that means they haven’t been visible for 40 frames — and may be behind cover. This gives us a very simple, performance-friendly way to determine visibility:
isVisible = (player.lastVisibleFrame >= currentFrame);
Tracing Visibility Logic in IDA
To find where this happens, we trace through the render pipeline. When the engine renders player models, it passes through the following function:
RenderPlayersModels() @ 0x415560
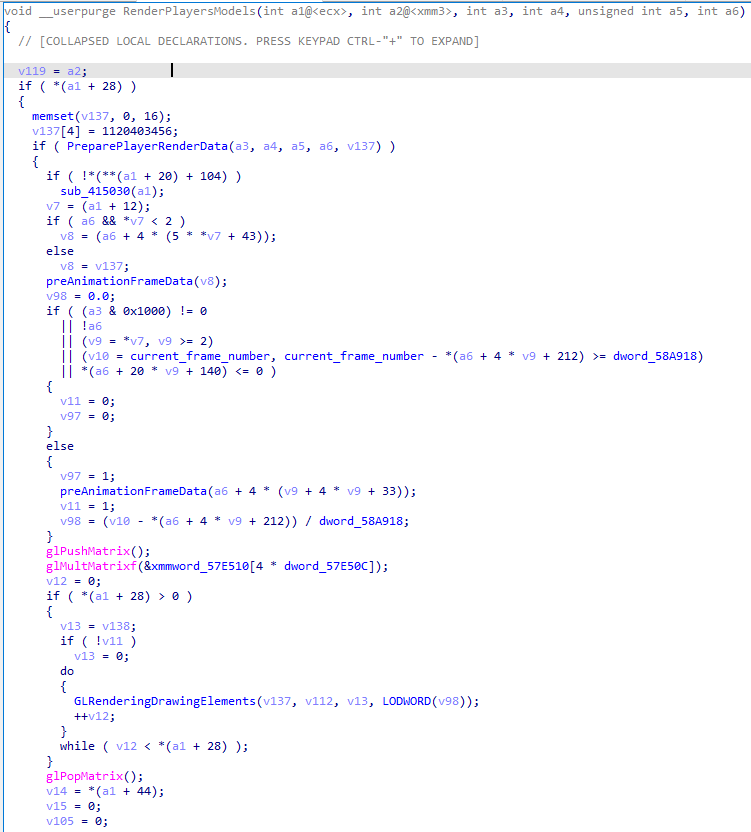
Which then calls:
PreparePlayerRenderData() @ 0x415320
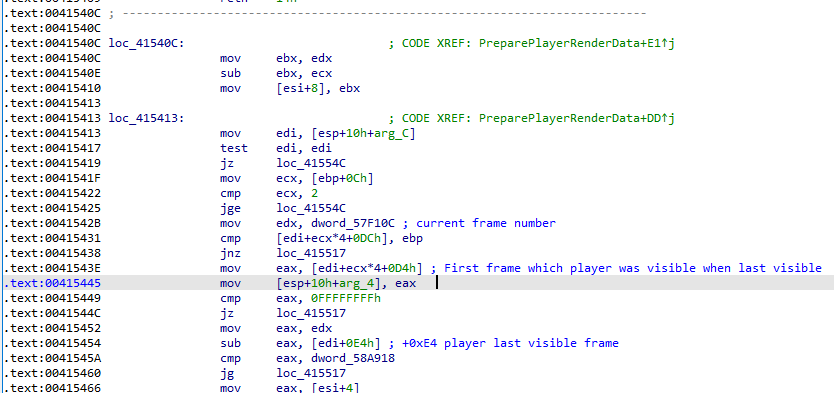
Inside PreparePlayerRenderData, we find this block:
mov     edx, dword_57F10C         ; current frame number
cmp     [edi+ecx*4+0DCh], ebp     ; (some per-player visibility test)
mov     eax, [edi+ecx*4+0D4h]     ; first visible frame
sub     eax, [edi+0E4h]           ; subtract last visible frame
cmp     eax, dword_58A918         ; compare with threshold
Let’s break this down:
-
dword_57F10Cis the current frame counter (we’ll call itOFFSET_CURRENT_FRAME). -
edi+ecx*4+0E4hpoints to each player’s last visible frame. - The game subtracts that value from the current frame to see how many frames ago the player was last seen.
- Then it compares against a threshold (
dword_58A918), to decide if the player is considered visible right now.
Deduced Offsets and Struct Fields
From the above logic, we can extract the following memory addresses:
constexpr uintptr_t OFFSET_CURRENT_FRAME   = 0x57F10C;
constexpr uintptr_t OFFSET_VISIBILITY_TEST = 0x58A918;
And update our PlayerStruct to include visibility fields:
struct PlayerStruct {
    ...
    int firstVisibleFrame1;  // 0xD4
    int firstVisibleFrame2;  // 0xD8
    char padD8_E4[0xE4 - 0xDC];
    int lastVisibleFrame;    // 0xE4
    ...
};
Validating Visibility in Cheat Engine
Once we understand how the game tracks player visibility using frame numbers, we can easily validate this in Cheat Engine by watching how the values change in real time. Here’s how you can do it:
- Attach Cheat Engine to AssaultCube.
- Add the address
0x57F10C(this isOFFSET_CURRENT_FRAME) as a 4-byte integer.- You’ll see it constantly increasing while the game is running — this is the global frame counter.
- Now go to the player list — for example, read the pointer at
OFFSET_PLAYERLIST + i * 4(whereiis the player index). - For any given player, add the offset
0xE4to their pointer. This is thelastVisibleFrame. - Observe how this value behaves depending on whether the player is on-screen or behind a wall. Let’s walk through what this looks like in Cheat Engine.
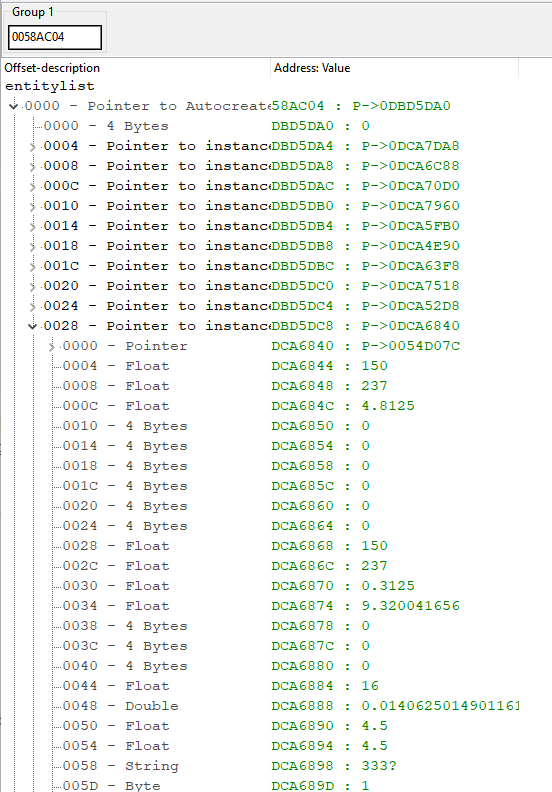
Entity List: Selecting the Player
In this image below, we’re browsing the player list in Cheat Engine. We've selected the player named Tomahawk by navigating through the entity list — each player is a pointer inside OFFSET_PLAYERLIST.
Player Never Seen: lastVisibleFrame == 0
In the following image, we’re looking at Tomahawk’s lastVisibleFrame value (offset 0xE4). In this test, we’ve never looked directly at the player — so their lastVisibleFrame is still 0, meaning they haven’t been rendered yet in our current view.

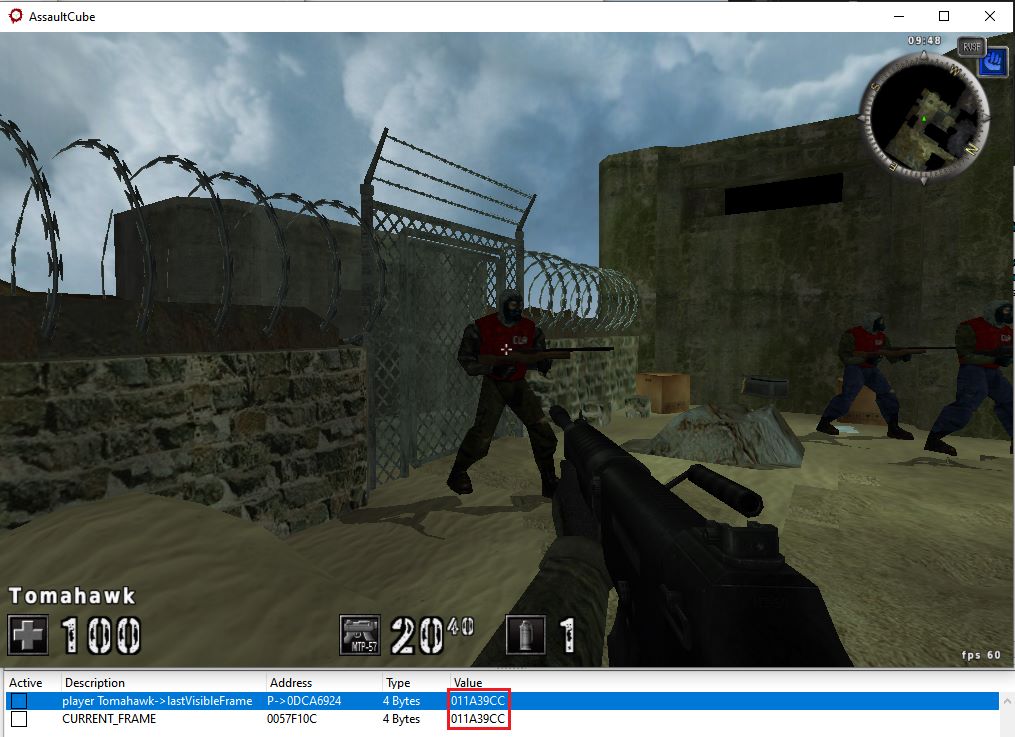
Player On Screen: lastVisibleFrame == currentFrame
Now, on the image below, we’re directly looking at the player on screen. You can see that Tomahawk’s lastVisibleFrame now matches the current_frame value (0x57F10C). This confirms the game just rendered them — visibility was confirmed on the current frame.
Player Hidden: lastVisibleFrame Stops Updating
Finally, in the following image, we then turn away so that Tomahawk is no longer on screen. The global current_frame continues increasing every tick, but Tomahawk’s lastVisibleFrame stays static — indicating that he’s no longer visible to the player camera.

Removing Recoil (Optional)
In most FPS games, firing a weapon causes your aim to be affected in two key ways:
- Recoil – your view angle (especially pitch) kicks upward after firing
- Spread – bullets deviate randomly from your crosshair
For an aimbot, it’s important to remove or neutralize these mechanics so that shots land exactly where the aim is directed. In this section, we’ll focus on removing recoil, specifically the change to view pitch. Spread and position kickback can also be patched, but are less critical in this case.
Understanding How Recoil Works
When you shoot a weapon in AssaultCube, the game increases your pitch angle (looking slightly up) to simulate vertical recoil. This pitch value is stored in memory at localplayer + 0x38. The logic usually goes like this:
- Recoil amount is calculated (based on weapon stats)
- Pitch is read from localplayer
- Recoil is added to pitch
- Result is written back
Finding the Recoil Function
We trace this logic back to a function responsible for updating player view when shooting. After inspecting the call graph of our gun firing, around 0x4C19C0
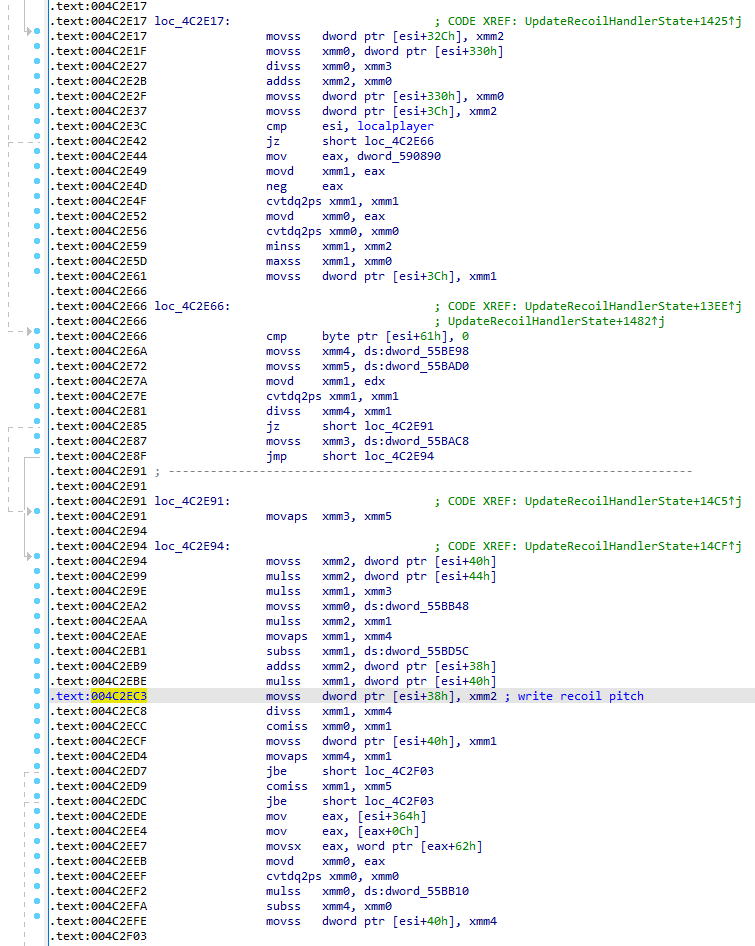
We find this block inside the function:
.text:004C2E94                 movss   xmm2, [esi+40h]
.text:004C2E99                 mulss   xmm2, [esi+44h]
...
.text:004C2EB9                 addss   xmm2, [esi+38h] ; ← adds recoil to pitch
.text:004C2EC3                 movss   [esi+38h], xmm2 ; ← saves new pitch
Here:
-
esipoints to the localplayer -
0x38is the pitch offset -
0x40and0x44are part of the recoil formula (intensity × factor) -
xmm2accumulates the result, and then it's stored back to[esi+38h]
This confirms that recoil is applied by modifying pitch directly, increasing it every time a shot is fired.
Removing the Recoil
If we want to disable recoil, the key instruction we care about is:
.text:004C2EB9 addss xmm2, [esi+38h]
This line adds the current pitch to the recoil vector. To disable recoil:
- We NOP this instruction (turn it into “do nothing”).
- That way, the new pitch never changes, and the player aim stays fixed.
This instruction is 6 bytes long, so we replace it with 6 NOP bytes:
90 90 90 90 90 90
You can apply this using WriteProcessMemory() in your cheat:
constexpr uintptr_t OFFSET_RECOIL = 0x004C2EB9;
BYTE nopPatch[6] = { 0x90, 0x90, 0x90, 0x90, 0x90, 0x90 };
WPM(OFFSET_RECOIL, nopPatch, sizeof(nopPatch));
You can also store the original bytes and toggle recoil on/off by restoring them.
Writing the External Cheat (with Aimbot and ESP)
Project Structure Overview
Here is the source code of this project: Github-AssaultCubeExternal.
Before diving into the implementation, here’s a breakdown of the project’s file layout. This helps keep everything organized as we add ESP, aimbot, recoil patching, and the menu.
/src
├── main.cpp              // Main loop and overall flow
├── globals.h/.cpp        // Global variables, constants, offsets, settings
├── memory.h              // Read/write memory helpers
├── vec.h                 // Vec2, Vec3, angle math
├── structs.h             // Raw game memory structs (PlayerStruct, WeaponEntry)
├── player.h/.cpp         // Player wrapper class with logic and drawing
├── cheats.h/.cpp         // ESP, aimbot, no recoil, player list building
├── render.h/.cpp         // Overlay window, ImGui, DirectX9 drawing
├── gameutils.h/.cpp      // Process attachment and window lookup
Here’s the general idea:
-
main.cppruns the loop and coordinates each feature per frame. -
render.cppcreates the overlay and handles all ImGui rendering. -
cheats.cppcontains the ESP, aimbot logic, and memory patching (e.g., recoil). -
player.cppwraps individual player pointers, and provides logic likeIsEnemy,DrawBox, etc. -
structs.hdefines the raw reversed structs as they exist in memory (likePlayerStruct).
If you ever want to read a new field from memory — like a different weapon pointer or gameplay stat — it should first be added to PlayerStruct in structs.h. That struct must match the exact layout in memory. From there, you can expose it through the Player wrapper with a helper or accessor.
Initial Game Attachment
Before we can draw anything or read memory, the first step is to attach to the game process. We need three things:
- The process ID (PID) of the game.
- A valid handle to the process with read/write access.
- The HWND of the game window so we can align our overlay correctly.
These three values — process ID, process handle, and game window — are the foundation for everything else. Without them, we can’t read memory, write patches, or align our overlay.
Finding the Game Process
We search for the AssaultCube process by name using the Windows Toolhelp API. This gives us the PID (process ID), which we’ll use to open a handle.
DWORD GetProcessID(const wchar_t* exeName) {
    PROCESSENTRY32W entry = { sizeof(entry) };
    HANDLE snapshot = CreateToolhelp32Snapshot(TH32CS_SNAPPROCESS, 0);
    if (snapshot == INVALID_HANDLE_VALUE) return 0;

    while (Process32NextW(snapshot, &entry)) {
        if (_wcsicmp(entry.szExeFile, exeName) == 0) {
            DWORD pid = entry.th32ProcessID;
            CloseHandle(snapshot);
            return pid;
        }
    }

    CloseHandle(snapshot);
    return 0;
}
This will return 0 if the process isn’t found. In our case, we’re looking for "ac_client.exe". Make sure the game is already running before launching the cheat.
Opening a Handle to the Game
Once we have the PID, we open a handle to the process with PROCESS_ALL_ACCESS so we can both read and write memory (PROCESS_ALL_ACCESS is overkill, but ensures we can do both reading and writing):
HANDLE OpenGameProcess(DWORD pid) {
    return OpenProcess(PROCESS_ALL_ACCESS, FALSE, pid);
}
Finding the Game Window
To draw the overlay correctly, we need to get the position and size of the game’s window. We loop through all top-level windows using FindWindowEx and check their owning process. When the process ID matches ours, we know it’s the game window:
HWND FindGameWindow(DWORD pid) {
    HWND hwnd = nullptr;
    while ((hwnd = FindWindowEx(nullptr, hwnd, nullptr, nullptr))) {
        DWORD windowPID = 0;
        GetWindowThreadProcessId(hwnd, &windowPID);
        if (windowPID == pid && IsWindowVisible(hwnd)) {
            return hwnd;
        }
    }
    return nullptr;
}
Putting It All Together: InitGame()
We wrap all three steps above into a single helper function, which gets called at the very beginning of main():
bool InitGame() {
    DWORD pid = GetProcessID(assault_cube_procname);
    if (!pid) {
        std::wcerr << L"[!] Failed to find process: " << assault_cube_procname << std::endl;
        return false;
    }

    hGame = OpenGameProcess(pid);
    if (!hGame) {
        std::wcerr << L"[!] Failed to open process handle." << std::endl;
        return false;
    }

    hwndGame = FindGameWindow(pid);
    if (!hwndGame) {
        std::wcerr << L"[!] Could not find game window." << std::endl;
        return false;
    }

    std::wcout << L"[+] Attached to " << assault_cube_procname << L" (PID: " << pid << L")" << std::endl;
    return true;
}
This is the first thing we run in main():
if (!InitGame()) {
    std::cerr << "Failed to initialize game.\n";
    return -1;
}
Memory Access
After attaching to the game process, everything we do — reading positions, checking health, changing view angles — depends on accessing the game's memory. This is how we get things like player positions, health, and team — and how we later modify values like pitch, yaw, recoil, or ammo. Instead of manually calling ReadProcessMemory every time, we wrap it in templated helper functions for clarity and type safety. These helpers keep the code clean and reduce mistakes — especially when working with raw pointers.
Reading a Single Value
For most values, we just want to read a value of type T at a specific address. This is what the basic read function looks like:
template<typename T>
T RPM(uintptr_t address) {
    T buffer{};
    ReadProcessMemory(hGame, reinterpret_cast<LPCVOID>(address), &buffer, sizeof(T), nullptr);
    return buffer;
}
Reading into a Struct
When reading larger chunks like player structs, we want to validate that the full memory block was read successfully. This reads into an existing buffer and returns true if the read completed:
template<typename T>
bool RPM(uintptr_t address, T& outBuffer) {
    SIZE_T bytesRead = 0;
    return ReadProcessMemory(hGame, reinterpret_cast<LPCVOID>(address), &outBuffer, sizeof(T), &bytesRead)
        && bytesRead == sizeof(T);
}
Reading Arrays or Buffers
Sometimes we want to read a sequence of values — for example, a string or a list of player pointers:
template<typename T>
void RPM(uintptr_t address, T* outBuffer, size_t count) {
    ReadProcessMemory(hGame, reinterpret_cast<LPCVOID>(address), outBuffer, sizeof(T) * count, nullptr);
}
Reading Float Arrays (Special Case)
For the view matrix, which is a 16-float array, we have a specialized template that returns a pointer to a static buffer:
template<>
inline float* RPM<float*>(uintptr_t address) {
    static float buffer[16]{};
    ReadProcessMemory(hGame, reinterpret_cast<LPCVOID>(address), &buffer, sizeof(buffer), nullptr);
    return buffer;
}
Writing Values
To change a value in memory — like aiming at someone or disabling recoil — we use:
template<typename T>
void WPM(uintptr_t address, const T& value) {
    WriteProcessMemory(hGame, reinterpret_cast<LPVOID>(address), &value, sizeof(T), nullptr);
}
Game Structures
Now that we can access memory, the next question is: what do we read, and how do we organize it? That means we will now be defining the structures used by the game — starting with the player. This section covers two parts:
- The raw in-memory structure that matches the game’s layout (
PlayerStruct) - A higher-level C++ class that wraps it (
Player) and adds logic like visibility, drawing, and aimbot helpers
Defining the PlayerStruct
PlayerStruct is a direct representation of how each player exists in memory. This was reversed ahead of time (e.g., with IDA or Cheat Engine), and its field order must match the game exactly. Here’s a simplified version:
struct PlayerStruct {
    DWORD32 vftable;
    Vec3 positionHead;
    char pad1[0x028 - 0x010];
    Vec3 positionFeet;
    float yaw;
    float pitch;
    // ...
    int health;
    int armor;
    char name[16];
    int state;  // used for team ID
    WeaponEntry* currentWeapon;
};
If you ever need to add a new field (for example: a pointer to a different weapon, or a new status flag), you must add it here in the correct order and offset. This is the source of truth for memory layout.
Once the field is in PlayerStruct, you can then expose it in the Player class through a helper method.
The Player Class
The Player class wraps a single PlayerStruct and adds helper logic, screen projection, and drawing functions. It’s designed to be simple to use inside ESP or aimbot code — without needing to access raw memory or worry about offsets. The goal here is to separate raw memory layout from gameplay logic — we read the memory once, then use clean C++ code to work with it.
At the core, the class looks like this:
class Player {
public:
    std::unique_ptr<PlayerStruct> internalStruct;
    PlayerStruct* ptr = nullptr;
    uintptr_t address = 0;

    Vec2 screenHead = {};
    Vec2 screenFeet = {};
    bool isEnemy = false;
    bool isVisible = false;
    float distance = 0.f;
    float boxHeight = 0.f;
    float boxWidth = 0.f;
    float distanceToAim = 0.f;

    Player(uintptr_t address);
    bool IsValid() const;
    bool IsAlive() const;
    bool IsEnemy(const Player& localPlayer) const;
    bool IsVisible(int currentFrame) const;

    void SetHealth(int value) const;
    void SetAmmo(int value) const;

    void ComputeBoxDimensions();
    void DrawBox(ImDrawList* drawList) const;
    void DrawHealthBar(ImDrawList* drawList) const;
    void DrawName(ImDrawList* drawList) const;
    void DrawSnapline(ImDrawList* drawList) const;
};
Overlay Rendering with ImGui
Once we have access to the game’s memory and player data, we need a way to draw what we’re seeing — boxes, health bars, names, menus, etc. We do this using an overlay window and ImGui, which is a UI library that runs on top of DirectX. In this section, we’ll set up:
- A transparent overlay window
- A DirectX9 device for rendering
- ImGui for drawing both ESP and our menu
Creating the Overlay Window
We create a window that sits over the game. This window is drawn using the Windows API, and we configure it like this:
wc = { sizeof(WNDCLASSEX), CS_CLASSDC, WndProc, 0L, 0L,
       GetModuleHandle(NULL), nullptr, nullptr, nullptr, nullptr,
       L"OverlayClass", nullptr };

RegisterClassEx(&wc);

hwndOverlay = CreateWindowExW(
    WS_EX_TOPMOST | WS_EX_LAYERED,
    L"OverlayClass", L"Overlay",
    WS_POPUP, 100, 100, 800, 600,
    nullptr, nullptr, wc.hInstance, nullptr
);
We mark it as:
-
WS_EX_TOPMOSTto stay on top of the game -
WS_EX_LAYEREDso we can make it transparent -
WS_POPUPto remove borders
Then we set the transparency:
SetLayeredWindowAttributes(hwndOverlay, RGB(0, 0, 0), 255, LWA_COLORKEY);
Finally, show it:
ShowWindow(hwndOverlay, SW_SHOW);
Initializing DirectX9
To draw anything, we need a DirectX9 rendering context. We initialize it like this:
pD3D = Direct3DCreate9(D3D_SDK_VERSION);

D3DPRESENT_PARAMETERS d3dpp = {};
d3dpp.Windowed = TRUE;
d3dpp.SwapEffect = D3DSWAPEFFECT_DISCARD;
d3dpp.hDeviceWindow = hwndOverlay;
d3dpp.BackBufferFormat = D3DFMT_A8R8G8B8;
d3dpp.BackBufferWidth = 800;
d3dpp.BackBufferHeight = 600;

pD3D->CreateDevice(D3DADAPTER_DEFAULT, D3DDEVTYPE_HAL, hwndOverlay,
    D3DCREATE_SOFTWARE_VERTEXPROCESSING, &d3dpp, &pDevice);
Initializing ImGui
Now we hook up ImGui to both our window and DirectX device:
ImGui::CreateContext();
ImGuiIO& io = ImGui::GetIO();
ImGui::StyleColorsDark();

ImGui_ImplWin32_Init(hwndOverlay);
ImGui_ImplDX9_Init(pDevice);
Handling Input and Messages
We need to pass input events (mouse, resize, etc.) to ImGui. In our window procedure (WndProc), we do this:
if (ImGui_ImplWin32_WndProcHandler(hWnd, msg, wParam, lParam))
    return true;
We also handle game window minimize/restore and resizing, so the overlay stays aligned.
In the main loop, we pump messages like this:
if (PeekMessage(&msg, NULL, 0U, 0U, PM_REMOVE)) {
    TranslateMessage(&msg);
    DispatchMessage(&msg);
}
Resizing the Overlay to Match the Game
Each frame, we check the size and position of the game window and move the overlay accordingly:
RECT clientRect;
GetClientRect(hwndGame, &clientRect);
POINT topLeft = { 0, 0 };
ClientToScreen(hwndGame, &topLeft);

screenWidth = clientRect.right;
screenHeight = clientRect.bottom;
MoveWindow(hwndOverlay, topLeft.x, topLeft.y, screenWidth, screenHeight, TRUE);
Without syncing window size/position, ESP drawings would become misaligned — either floating in the wrong spot or drawn offscreen. That’s why we re-align the overlay to match the game window every frame.
Handling Device Reset
In DirectX9, if the window is resized or toggled fullscreen, the device enters a “lost” state. If you try to render in this state, you’ll get flickering or crashes — so we must recreate ImGui’s render objects after a reset. This is a known quirk of DirectX9:
ImGui_ImplDX9_InvalidateDeviceObjects();
HRESULT hr = pDevice->Reset(&d3dpp);
ImGui_ImplDX9_CreateDeviceObjects();
We only do this when the screen size changes, to avoid performance issues.
Beginning and Ending the Frame
Every frame (i.e., once per game tick or overlay render update), we update player positions, run the aimbot logic, and draw all visuals. We wrap our rendering logic between a..
Begin call:
void BeginImGuiFrame(ImGuiIO& io) {
    ImGui_ImplDX9_NewFrame();
    ImGui_ImplWin32_NewFrame();
    io.MouseDown[0] = (GetAsyncKeyState(VK_LBUTTON) & 0x8000) != 0;
    ImGui::NewFrame();
}
and End call:
void EndImGuiFrame() {
    ImGui::Render();
    pDevice->Clear(0, NULL, D3DCLEAR_TARGET, D3DCOLOR_ARGB(0, 0, 0, 0), 1.0f, 0);

    if (pDevice->BeginScene() >= 0) {
        ImGui_ImplDX9_RenderDrawData(ImGui::GetDrawData());
        pDevice->EndScene();
    }

    pDevice->Present(NULL, NULL, NULL, NULL);
}
Cleanup on Exit
Before exiting, we clean up all DirectX and ImGui resources:
ImGui_ImplDX9_Shutdown();
ImGui_ImplWin32_Shutdown();
ImGui::DestroyContext();

if (pDevice) pDevice->Release();
if (pD3D) pD3D->Release();

UnregisterClass(wc.lpszClassName, wc.hInstance);
World-to-Screen Projection
With the overlay set up and rendering correctly, we’re ready to start drawing ESP elements. You can’t draw a 3D point directly onto a 2D screen — the math just doesn’t work that way. To figure out where to draw things like boxes or names, we need to convert a 3D world position into a 2D screen pixel using the view matrix (which we previously explained).
constexpr uintptr_t OFFSET_VIEWMATRIX_BASE = 0x0057DFD0;
The WorldToScreen Function
Once we have the view matrix, we use it to transform any Vec3 (world position) into a Vec2 (screen pixel):
bool WorldToScreen(const Vec3& world, Vec2& screen, float* m, int width, int height) {
    float clipX = world.x * m[0] + world.y * m[4] + world.z * m[8]  + m[12];
    float clipY = world.x * m[1] + world.y * m[5] + world.z * m[9]  + m[13];
    float clipW = world.x * m[3] + world.y * m[7] + world.z * m[11] + m[15];

    if (clipW < 0.001f)
        return false; // Behind the camera

    float ndcX = clipX / clipW;
    float ndcY = clipY / clipW;

    screen.x = (width  / 2.0f) + (ndcX * width  / 2.0f);
    screen.y = (height / 2.0f) - (ndcY * height / 2.0f);
    return true;
}
What’s happening here:
-
clipX,clipY, andclipWare intermediate values in clip space. It’s what you get after multiplying a world position by the view-projection matrix. - We divide by
clipWto get Normalized Device Coordinates (range -1 to 1).clipWrepresents how far the point is from the camera. If it’s less than or close to zero, the object is behind the camera or too close to be rendered properly. - Then we scale those values into actual screen pixel positions based on your resolution.
If
clipWis very small, the point is behind the camera — so we return false and skip drawing anything.
Applying WorldToScreen to Players
In the player loop, we use this function to project both the head and feet positions:
if (!WorldToScreen(p.HeadPos(), p.screenHead, viewMatrix, screenWidth, screenHeight)) continue;
if (!WorldToScreen(p.FeetPos(), p.screenFeet, viewMatrix, screenWidth, screenHeight)) continue;
Once these two points are projected, we can:
- Compute the box height and width
- Draw health bars next to the player
- Calculate screen distance to crosshair for aimbot
Handling Off-Screen Players
If WorldToScreen returns false, the position is either behind the player or out of the view frustum. We simply skip them:
if (!WorldToScreen(...)) continue;
No need to clamp or wrap anything — just don’t draw what isn’t visible.
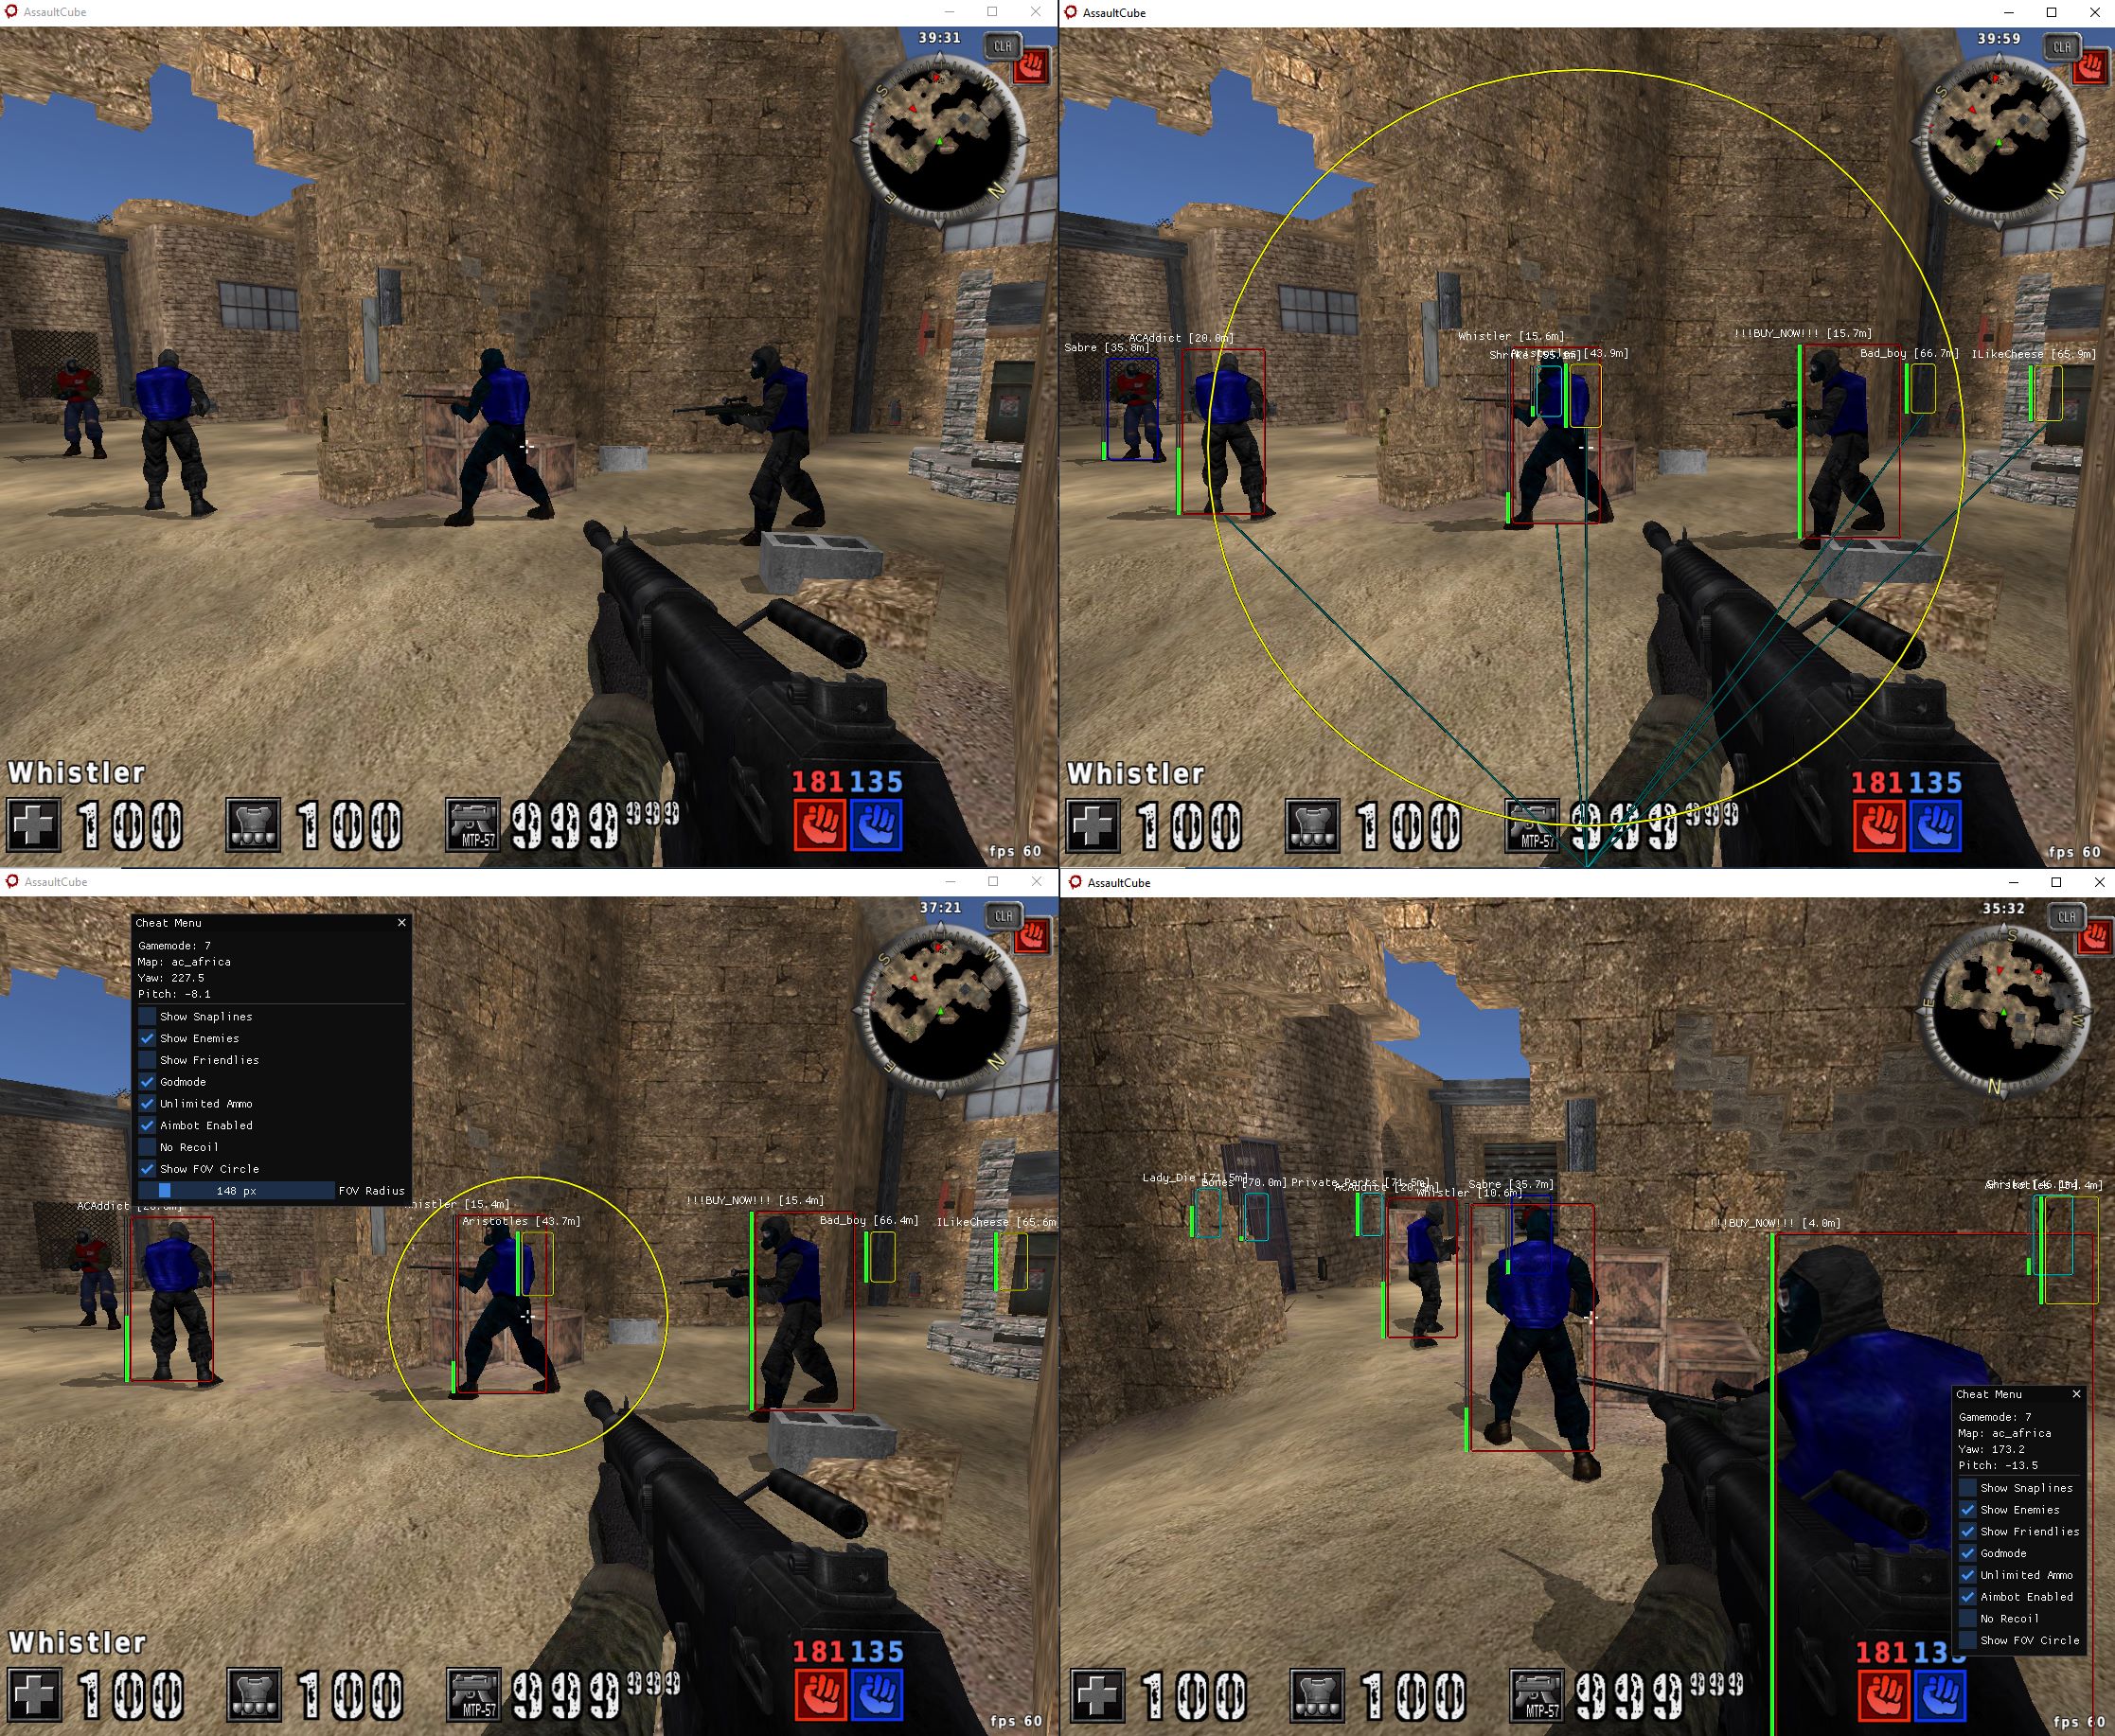
ESP Rendering
With the overlay in place and 3D positions projected onto the screen, we can now start drawing actual ESP (Extra Sensory Perception) visuals. This includes:
- Boxes around enemies and teammates
- Health bars
- Player names and distances
- Snaplines from the center of the screen
This is where everything comes together: memory reading, player structures, screen projection, and drawing.
Building the Player List
Before we can draw anything, we need to loop through all the players in the game and collect the data we need. We start by reading the total number of players and the base pointer to the player list:
int numPlayers = RPM<int>(OFFSET_NUMPLAYERS);
uintptr_t listPtr = static_cast<uintptr_t>(RPM<uint32_t>(OFFSET_PLAYERLIST));
We make sure these values are valid before continuing:
if (listPtr == 0 || numPlayers <= 0 || numPlayers > MAX_PLAYERS)
    return {};
Then, we collect all the screen-projected, filtered player data before we draw anything. This ensures the ESP drawing step stays clean and independent of memory access:
for (int i = 0; i < MAX_PLAYERS; ++i) {
    uintptr_t entryAddress = listPtr + i * sizeof(uint32_t);
    uintptr_t playerPtr = static_cast<uintptr_t>(RPM<uint32_t>(entryAddress));
    if (!playerPtr) continue;

    Player p(playerPtr);
    if (!p.IsValid() || !p.IsAlive()) continue;

    if (!WorldToScreen(p.HeadPos(), p.screenHead, viewMatrix, screenWidth, screenHeight)) continue;
    if (!WorldToScreen(p.FeetPos(), p.screenFeet, viewMatrix, screenWidth, screenHeight)) continue;

    p.isEnemy = p.IsEnemy(localPlayer);
    p.isVisible = p.IsVisible(currentFrame);
    p.distance = p.DistanceTo(localPlayer);
    p.ComputeBoxDimensions();
    p.distanceToAim = Vec2{ (float)screenWidth / 2, (float)screenHeight / 2 }.DistanceTo(p.screenHead);

    players.push_back(std::move(p));
    if ((int)players.size() >= numPlayers - 1) break;
}
Drawing ESP Elements
Inside our DrawESP() function, we loop through the list of players and call drawing helpers from the Player class. These are calculated each frame using WorldToScreen() to project the player's 3D positions into screen space:
for (const auto& player : players) {
    if (settings.showEnemies && player.isEnemy) {
        player.DrawBox(drawList);
        player.DrawHealthBar(drawList);
        player.DrawNameAndDistance(drawList);
        if (settings.showSnaplines)
            player.DrawSnapline(drawList);
    }

    if (settings.showFriendlies && !player.isEnemy) {
        player.DrawBox(drawList);
        player.DrawHealthBar(drawList);
        player.DrawNameAndDistance(drawList);
        if (settings.showSnaplines)
            player.DrawSnapline(drawList);
    }
}
Computing Box Dimensions
Before drawing anything, we calculate the height and width of the ESP box using the screen coordinates of the head and feet:
void Player::ComputeBoxDimensions() {
    boxHeight = screenFeet.y - screenHead.y;
    boxWidth = boxHeight * 0.5f;
}
Boxes
The DrawBox() method draws a rectangle around the player:
ImVec2 topLeft = GetBoxTopLeft();
ImVec2 bottomRight = GetBoxBottomRight();
drawList->AddRect(topLeft, bottomRight, GetBoxColor(), 3.0f, 0, 1.0f);
Box color changes based on team and visibility.
- Enemy visible: Red
- Enemy invisible: Yellow
- Ally visible: Blue
- Ally invisible: Cyan
ImU32 Player::GetBoxColor() const {
    if (isEnemy) {
        return isVisible ? IM_COL32(255, 0, 0, 255) : IM_COL32(255, 255, 0, 255);
    } else {
        return isVisible ? IM_COL32(0, 0, 255, 255) : IM_COL32(0, 255, 255, 255);
    }
}
Health Bars
Health bars are drawn to the left of the box. We calculate the fill amount based on current health:
float boxHeight = screenFeet.y - screenHead.y;
float healthPct = clamp(GetHealth() / 100.0f, 0.0f, 1.0f);
float barHeight = boxHeight * healthPct;

ImVec2 barStart = { topLeft.x - 6, bottomRight.y - barHeight };
ImVec2 barEnd   = { topLeft.x - 2, bottomRight.y };

drawList->AddRectFilled(barStart, barEnd, IM_COL32(0, 255, 0, 255));
drawList->AddRect(ImVec2(topLeft.x - 6, topLeft.y), ImVec2(topLeft.x - 2, bottomRight.y), IM_COL32(255, 255, 255, 100));
Names and Distances
Above the box, we draw the player's name and the distance to them:
char buf[64];
snprintf(buf, sizeof(buf), "%s [%.1fm]", GetName(), distance);
DrawTextAboveBox(drawList, buf, -18.0f);
Snaplines
Snaplines are lines drawn from the bottom of the box to the center of the screen:
ImVec2 bottom = GetBoxBottomRight();
ImVec2 centerScreen = { screenWidth / 2.0f, screenHeight };

drawList->AddLine(
    ImVec2((bottom.x + GetBoxTopLeft().x) / 2, bottom.y),
    centerScreen,
    IM_COL32(0, 255, 255, 100), 1.5f
);
FOV Circle
If the aimbot is enabled, we can also draw a FOV circle to visualize the aimbot’s targeting range:
if (settings.showFovCircle) {
    ImVec2 center = { screenWidth / 2.0f, screenHeight / 2.0f };
    drawList->AddCircle(center, settings.fovSize, IM_COL32(255, 255, 0, 255), 64, 2.0f);
}
Aimbot Logic
The aimbot is a feature that automatically adjusts the player's camera angles to aim at the closest visible enemy. It’s simple and reactive: it only runs when you're holding down the right mouse button.
The logic relies on all the pieces we’ve already built:
- We read player positions from memory
- Project them to screen space
- Filter for visibility and enemy status
- Calculate the angle from our player to theirs
- Write the new yaw and pitch directly into memory
Triggering the Aimbot
Since we don’t want the aimbot to run constantly — we only run it when:
- The feature is toggled on
- The player is holding
RMB(right mouse button)
if (!settings.enableAimbot) return;
if (!(GetAsyncKeyState(VK_RBUTTON) & 0x8000)) return;
Selecting the Best Target
We loop through our list of players and pick the closest visible enemy inside the FOV circle:
const Player* closestPlayer = nullptr;

for (const auto& player : players) {
    if (!player.isEnemy || !player.isVisible) continue;
    if (player.distanceToAim > settings.fovSize) continue;

    if (!closestPlayer || player.distanceToAim < closestPlayer->distanceToAim)
        closestPlayer = &player;
}
This uses distanceToAim, which is the 2D screen-space distance from the player's head to the center of your screen (your crosshair). It was computed earlier during projection:
p.distanceToAim = Vec2{ screenWidth / 2, screenHeight / 2 }.DistanceTo(p.screenHead);
Calculating the Aim Angles
Now we know who to aim at — next step is figuring out how to aim. We use simple trigonometry to calculate how much to rotate horizontally (yaw) and vertically (pitch) to aim from our head to theirs:
Vec2 aimAngles = CalcAimAngles(localPlayer.HeadPos(), closestPlayer->HeadPos());
The implementation in vec.h looks like this:
inline Vec2 CalcAimAngles(const Vec3& from, const Vec3& to) {
    Vec3 delta = to - from;
    float yaw = std::atan2(delta.y, delta.x) * RAD2DEG + 90.0f;
    float pitch = std::asin(delta.z / from.Distance(to)) * RAD2DEG;
    return Vec2(pitch, yaw);
}
What’s happening here:
-
atan2(y, x)gives us the horizontal angle between the two points (yaw) -
asin(z / dist)gives us the vertical angle (pitch) - We convert radians to degrees (
RAD2DEG) and offset yaw by 90 degrees (because of how this game stores angle 0 as facing "north")
Writing the Angles
Finally, we patch the new yaw and pitch directly into the local player struct:
WPM<float>(localPlayer.address + 0x34, aimAngles.y); // yaw
WPM<float>(localPlayer.address + 0x38, aimAngles.x); // pitch
These offsets (+0x34 for yaw and +0x38 for pitch) were discovered during the reversing phase and directly represent the camera orientation in memory. By writing new values to them, we instantly update the player’s view direction in-game — there's no delay or need to simulate input. The game simply reads those angles on the next frame and renders accordingly.
Alternatively, you could simulate mouse movement to achieve similar results — either using SendInput, or more reliably with Interception, which hooks low-level input drivers. But directly writing memory is simpler and significantly more accurate, making it the preferred method for an internal or external memory-based aimbot.
Additional Features (No Recoil, Godmode, etc.)
While ESP and aimbot rely on reading and projecting player positions, there are other features that involve directly modifying game behavior. In this section, we’re going to cover:
- No recoil patching
- Godmode (freezing health and armor)
- Infinite ammo (freezing ammo and magasine)
No Recoil
In AssaultCube, recoil is handled by a small piece of code that writes viewkick values into your view angles when shooting. To remove recoil, we overwrite those instructions with NOPs (0x90), which tell the CPU to "do nothing."
We already know the address of the recoil instruction:
constexpr uintptr_t OFFSET_RECOIL = 0x004C2EC3;
We define a toggle in our settings:
bool noRecoil = false;
And apply the patch like this:
void UpdateNoRecoilPatch() {
    if (settings.noRecoil && !noRecoilCurrentlyPatched) {
        BYTE nopPatch[5] = { 0x90, 0x90, 0x90, 0x90, 0x90 };
        WPM(OFFSET_RECOIL, nopPatch, sizeof(nopPatch));
        noRecoilCurrentlyPatched = true;
    }
    else if (!settings.noRecoil && noRecoilCurrentlyPatched) {
        BYTE originalBytes[5] = { 0xF3, 0x0F, 0x11, 0x56, 0x38 };
        WPM(OFFSET_RECOIL, originalBytes, sizeof(originalBytes));
        noRecoilCurrentlyPatched = false;
    }
}
Godmode and Infinite Ammo
Unlike the recoil patch, which disables logic, these features work by force-writing values into memory every frame. This prevents the game from lowering health, armor, or ammo — effectively freezing them. Magazines and ammo are stored separately. Setting both to 999 ensures you don’t run out in the clip or in reserve. For example, in the Player class:
void SetHealth(int value) const { if (address) WPM<int>(address + 0xEC, value); }
void SetShield(int value) const { if (address) WPM<int>(address + 0xF0, value); }
void SetMag(int value) const { if (address) WPM<int>(address + 0x11C, value); }
void SetAmmo(int value) const { if (address) WPM<int>(address + 0x140, value); }
Then in GetLocalPlayer(), we apply these settings if toggled:
Player local(OFFSET_LOCALPLAYER, true);
if (!local.IsValid()) return Player();

if (settings.infiniteAmmo) {
    local.SetAmmo(999);
    local.SetMag(999);
}

if (settings.godmode) {
    local.SetHealth(100);
    local.SetShield(100);
}

return local;
Menu UI (ImGui Menu)
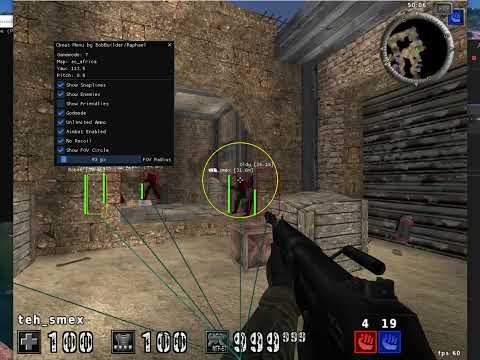
Every cheat needs a way to toggle features on and off without recompiling or restarting the program. We use ImGui to create a minimal, functional in-game menu. It’s opened with the INSERT key and lets us toggle visuals, patches, and aimbot behavior in real time.
Since the overlay window is transparent and click-through by default, we need to temporarily let it receive mouse input when the menu is open. That’s handled outside this snippet by adjusting the window’s input flags dynamically (already working in the base setup). If you click inside the menu and it loses focus, make sure the overlay stays on top and in focus while it’s open.
Variables
The CheatSettings struct (defined in globals.h) holds all the state for toggles. It’s shared across the project so any part of the code (ESP, aimbot, UI) can read or modify the current settings.
struct CheatSettings {
    bool showMenu = false;
    bool showSnaplines = true;
    bool showEnemies = true;
    bool showFriendlies = true;
    bool godmode = true;
    bool infiniteAmmo = true;
    bool enableAimbot = true;
    bool noRecoil = false;
    bool showFovCircle = true;
    float fovSize = 400.0f;
};
Toggling the Menu
We use GetAsyncKeyState to detect if the INSERT key was pressed:
bool keyPressed = (GetAsyncKeyState(VK_INSERT) & 1);
if (keyPressed && !lastKeyState)
    settings.showMenu = !settings.showMenu;
lastKeyState = keyPressed;
Rendering the Menu
void DrawMenu(const Player& localPlayer) {
    if (!ImGui::GetCurrentContext() || !settings.showMenu)
        return;

    ImGui::SetNextWindowPos(ImVec2(100, 100), ImGuiCond_FirstUseEver);
    ImGui::SetNextWindowSize(ImVec2(400, 300), ImGuiCond_FirstUseEver);

    if (ImGui::Begin("Cheat Menu", &settings.showMenu, ImGuiWindowFlags_NoCollapse | ImGuiWindowFlags_AlwaysAutoResize)) {
        // Debug/game info
        int gamemode = RPM<int>(OFFSET_GAMEMODE);
        char mapName[32] = {};
        RPM<char>(OFFSET_MAPNAME, mapName, 32);

        ImGui::Text("Gamemode: %d", gamemode);
        ImGui::Text("Map: %s", mapName);
        ImGui::Text("Yaw: %.1f", localPlayer->yaw);
        ImGui::Text("Pitch: %.1f", localPlayer->pitch);
        ImGui::Separator();

        // Feature toggles
        ImGui::Checkbox("Show Snaplines", &settings.showSnaplines);
        ImGui::Checkbox("Show Enemies", &settings.showEnemies);
        ImGui::Checkbox("Show Friendlies", &settings.showFriendlies);
        ImGui::Checkbox("Godmode", &settings.godmode);
        ImGui::Checkbox("Unlimited Ammo", &settings.infiniteAmmo);
        ImGui::Checkbox("Aimbot Enabled", &settings.enableAimbot);
        ImGui::Checkbox("No Recoil", &settings.noRecoil);
        ImGui::Checkbox("Show FOV Circle", &settings.showFovCircle);

        if (settings.showFovCircle)
            ImGui::SliderFloat("FOV Radius", &settings.fovSize, 50.0f, 1000.0f, "%.0f px");
    }

    ImGui::End();
}
Main Loop and Runtime
All the features we’ve built — memory access, ESP, aimbot, patches, menu, and rendering — now come together inside a clean, efficient main loop. This loop runs continuously while the game is open and takes care of:
- Updating the overlay position and size
- Handling input and menu toggles
- Rebuilding the player list
- Running ESP, aimbot, and other cheats
- Rendering each frame via ImGui
Core Loop Structure
Here’s the skeleton of the main() loop:
// Main loop: keep running until a WM_QUIT message is received (e.g., from closing the window)
while (msg.message != WM_QUIT) {
    // Poll and dispatch any pending Windows messages (like input, resizing, etc.)
    HandleWindowMessages(msg);
    // Update overlay size and position to match the game window
    UpdateRenderDimensions();
    // If the window size changed, reset the DirectX device and recreate ImGui resources
    if (!HandleDeviceResetIfNeeded(lastWidth, lastHeight))
        break; // If the reset failed, break the loop and exit
    // Update ImGui's screen resolution info
    io.DisplaySize = ImVec2((float)screenWidth, (float)screenHeight);
    // If the game is minimized, hide the overlay and skip this frame
    if (IsGameMinimized()) {
        ShowWindow(hwndOverlay, SW_HIDE);
        continue;
    } else {
        // If the game is active, make sure overlay is visible
        ShowWindow(hwndOverlay, SW_SHOW);
    }
    // --- INPUT AND TOGGLES ---
    // Check if the INSERT key was just pressed (used to toggle the menu)
    bool keyPressed = (GetAsyncKeyState(VK_INSERT) & 1);
    if (keyPressed && !lastKeyState)
        // Toggle menu visibility
        settings.showMenu = !settings.showMenu;
	// Save the key state to prevent double-toggling
    lastKeyState = keyPressed;
    // --- MAIN CHEAT LOGIC ---
    // Read the local player from memory (and apply freeze values if enabled)
    Player localPlayer = GetLocalPlayer();
    // Build the list of all valid players, with screen projection data
    auto players = BuildPlayerList(localPlayer);
    // Begin ImGui rendering for this frame
    BeginImGuiFrame(io);
    // Render the ImGui settings menu if enabled
    DrawMenu(localPlayer);
    // Apply or remove the no recoil patch based on toggle state
    UpdateNoRecoilPatch();
    // Optionally draw a circle showing the aimbot's active field-of-view
    DrawFOV();
    // Draw boxes, names, health bars, and snaplines for all players
    DrawESP(players);
    // Run aimbot logic: find closest target and write pitch/yaw to memory
    Aimbot(players, localPlayer);
    // End ImGui frame: render all queued draw calls (menu and ESP)
    EndImGuiFrame();
    // Small sleep to reduce CPU usage and avoid a 100% load
    Sleep(10);
}
// Cleanup DirectX, ImGui, and window resources on exit
Cleanup();
Resizing and Repositioning
Each frame, we make sure the overlay is aligned with the game:
void UpdateRenderDimensions() {
    RECT clientRect;
    GetClientRect(hwndGame, &clientRect);
    POINT topLeft = { 0, 0 };
    ClientToScreen(hwndGame, &topLeft);

    screenWidth = clientRect.right;
    screenHeight = clientRect.bottom;

    MoveWindow(hwndOverlay, topLeft.x, topLeft.y, screenWidth, screenHeight, TRUE);
}
Handling Device Reset
If the screen size has changed, we reset the DirectX device and re-create ImGui resources:
if (screenWidth == lastWidth && screenHeight == lastHeight)
    return true;

lastWidth = screenWidth;
lastHeight = screenHeight;

ImGui_ImplDX9_InvalidateDeviceObjects();
HRESULT hr = pDevice->Reset(&d3dpp);
ImGui_ImplDX9_CreateDeviceObjects();
Message Pump
We call this every frame to keep ImGui and the overlay window functional:
void HandleWindowMessages(MSG& msg) {
    if (PeekMessage(&msg, NULL, 0U, 0U, PM_REMOVE)) {
        TranslateMessage(&msg);
        DispatchMessage(&msg);
    }
}
Graceful Exit and Cleanup
When the loop exits (either from an error or closing the overlay), we clean up everything:
void Cleanup() {
    ImGui_ImplDX9_Shutdown();
    ImGui_ImplWin32_Shutdown();
    ImGui::DestroyContext();

    if (pDevice) pDevice->Release();
    if (pD3D) pD3D->Release();

    UnregisterClass(wc.lpszClassName, wc.hInstance);
}
Conclusion
This article was written for educational purposes only — to help readers understand how memory, systems programming, and game internals work. This cheat was intentionally kept simple — it’s meant to teach concepts, not evade detection or perform in production settings. Cheating in online games or in any context where it is not explicitly permitted should be strictly avoided. The goal is not to disrupt gameplay or harm others, but to build technical knowledge in a responsible, offline setting against bots.
In a future guide, I’ll cover how to build an internal cheat, which allows for deeper integration through function hooks, in-engine drawing, and logic manipulation.
If you have any questions or feedback, feel free to open an issue or discussion on the GitHub repo or comment on the YouTube video. I'm happy to help or improve the guide based on suggestions.
If you’ve followed along this far, you now have a solid foundation to keep learning, building, and experimenting — safely and with purpose.
Thanks for reading!
- BobBuilder / Raphaël